Top rated

Inflatable boat losing air?
How can air leaks in an inflatable boat, kayak, or raft be found and fixed?
Simple answer: Aside from the usual air pressure loss brought on by cooler weather, if your inflatable watercraft is losing air pressure, air must escape somewhere, at some spot, for the air chamber(s) to soften.
Finding the leak Overview
One of the best tools to find air leaks is soap, shampoo, or dish detergent, mixed with water in a spray bottle or bucket. Also great is kid's bubble solution, as it creates the strongest bubbles.
1. Start by checking the air valves first. Remember, the number one cause of slow leaks is due to poorly fitted valves, which simply might need more tightening. Fully inflate the air chamber to max air pressure. Then spray soapy mix around the air valve on a suspected air chamber. Or, use a large brush or rag to apply soapy mix all over the valve location. Make sure that the valve cap is closed. If you see bubbles forming, check your valve fitting and base and be sure the valve insert is screwed on tight and the pushpin is in the correct position. See our FAQ below for more help with leaky air valves. https://www.boatstogo.com/faq.asp
2. If there are no bubbles visible on or around air valves, then check the fabric seams on your inflatable. Spray or apply the soapy mix with a brush all along the seams. Give it a few minutes, and then check for bubbles forming along the seam lines. You can use a flashlight to spot along seams to detect any suspicious movement of bubbles. Sometime leak can be so slow that bubbles are barely visible. If the seam produces no bubbles at all, then the issue is not with a seam, but with a surface puncture.
3. To find tiny, difficult to spot air leaks on a boat's surface, fully inflate the boat until it's hard to the touch. Put some liquid detergent in a bucket of water and scrub it all over the chamber surface with rag, towel or big wash brush. Watch for tiny bubbles. When you find the first leak, mark with tape, and keep looking, as there could be more than one. Please see below for fixing small punctures.
If you have no luck finding a slow leak with air bubbles, then inflate the boat to its maximum air pressure and try to listen for the leak. If you can narrow the area down, return with a spray bottle to identify the source of the leak. Also, see below video of method to locate hard to sport leaks with a clinging food plastic wrap.
Do not try to spray soapy mix all over the boat, because it will be difficult to spot bubble location. Divide air chamber surface into imaginary squares, and apply soapy mix to that square and then look against surface to see for bubbles. If no bubbles are appears after 5-10 minutes, then move to another square.
If all above methods failed, last thing you can try is to submerge sections of inflatable chamber under water and look for bubbles that way. Chamber can be partially inflated for that method.
Repair Methods Overview
Small puncture.
Punctures less than 1/8" in size can be repaired simply without a patch. Deflate your boat, then clean and dry the area to be repaired. If available, use Acetone or MEK for cleaning of area. Apply a small drop of glue from repair kit to cover the puncture, and let dry for 24 hours. If you need to get on the water sooner, let dry for 30 minutes and then inflate the air chamber, inflating the compartment with the repair only 3/4 full. This repair might not be permanent so add a drop again at a later date to make it permanent.
Glue failure.
We must keep in mind that in some cases the whole inflatable watercraft, including all seams, and air floor seams, and transom if any, all attachments, D-rings, etc, absolutely everything you see in front of you, has been glued together, seam-by-seam, by human hands at a factory. There is no magic, involved in gluing a seam or a patch. There is however few tricks of the trade that do exist and If you do everything correctly, then repairs can for a long time.
Patching.
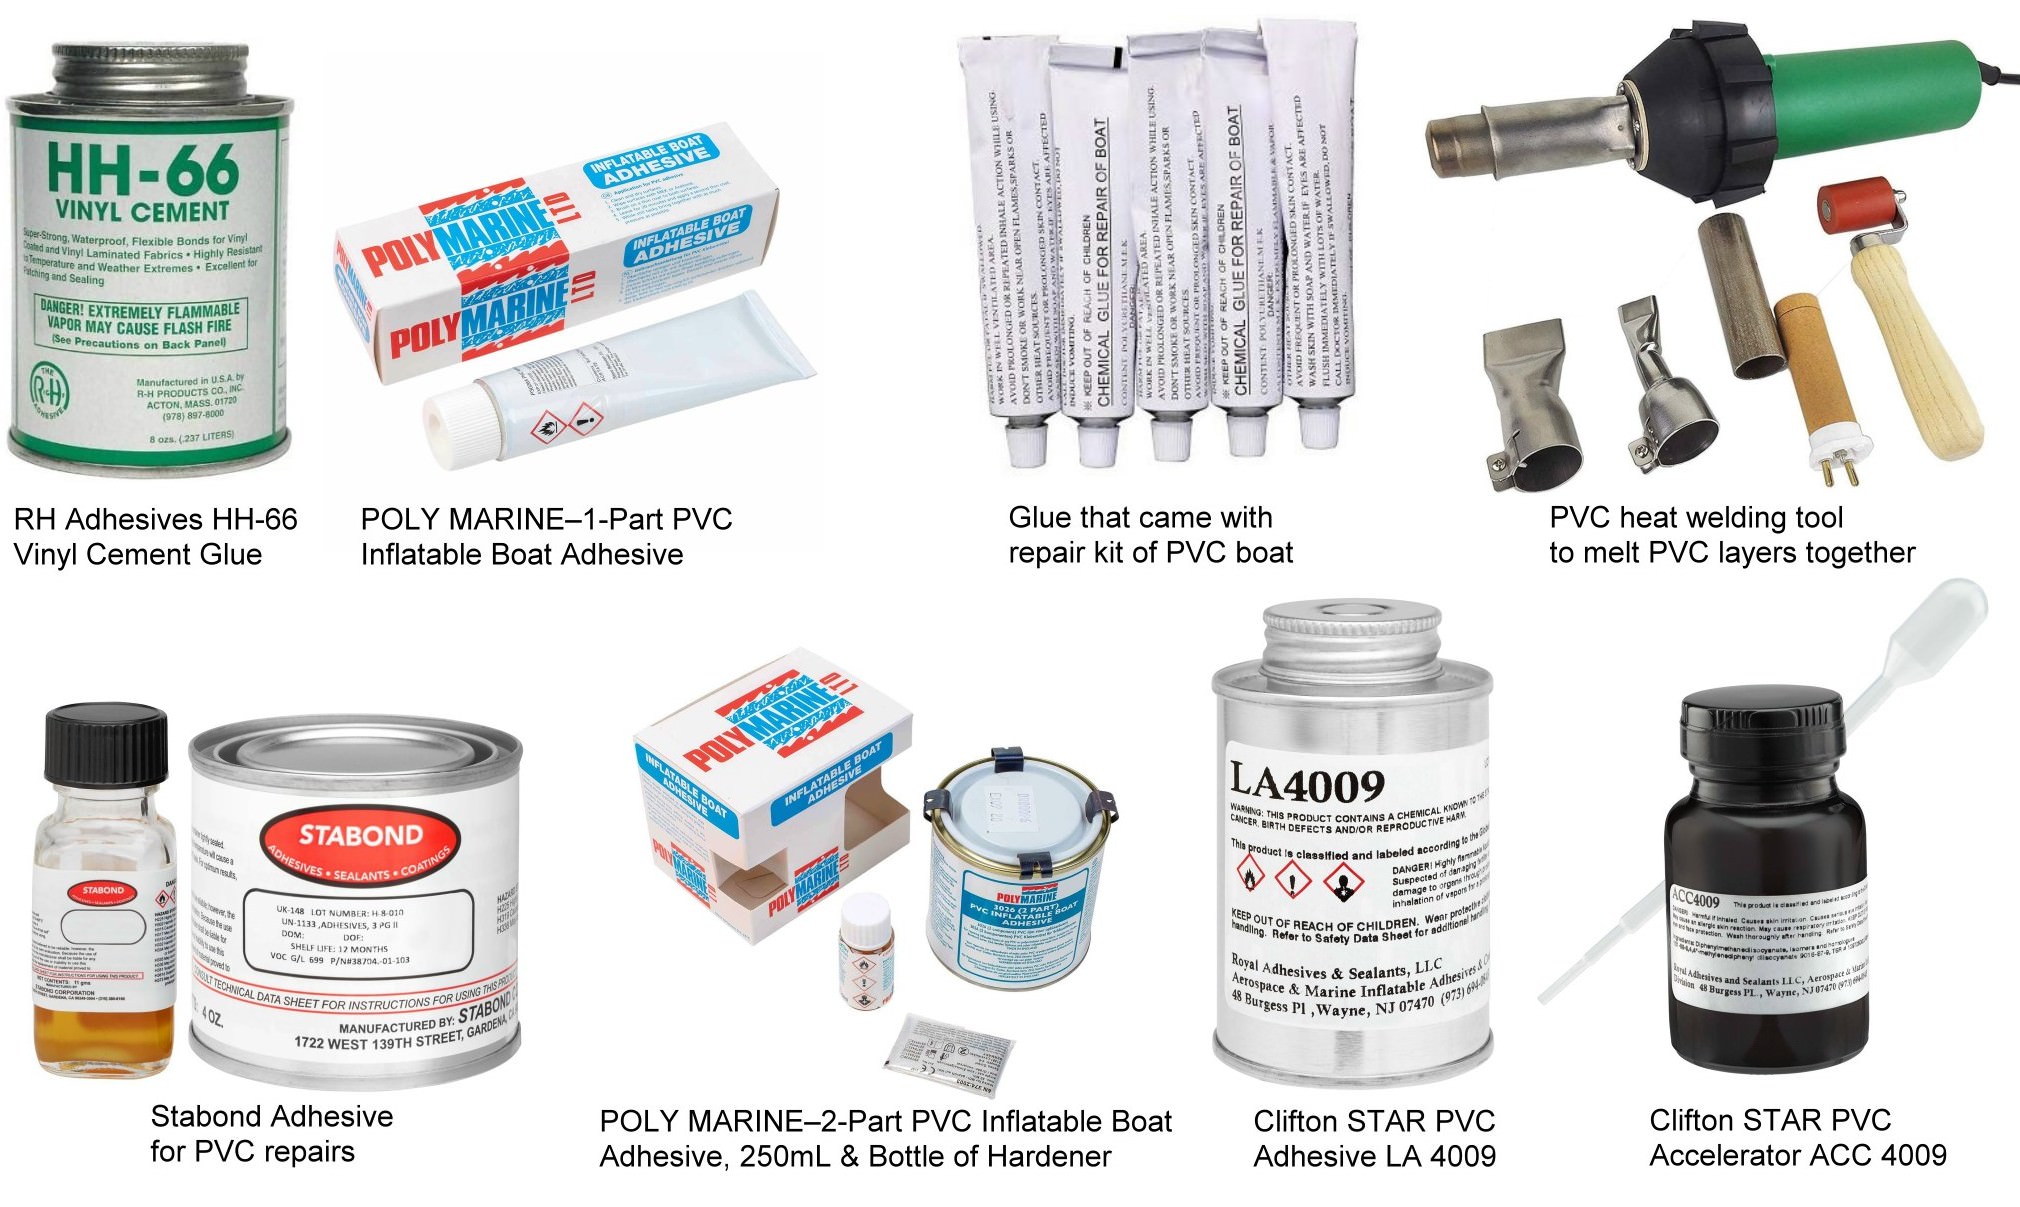
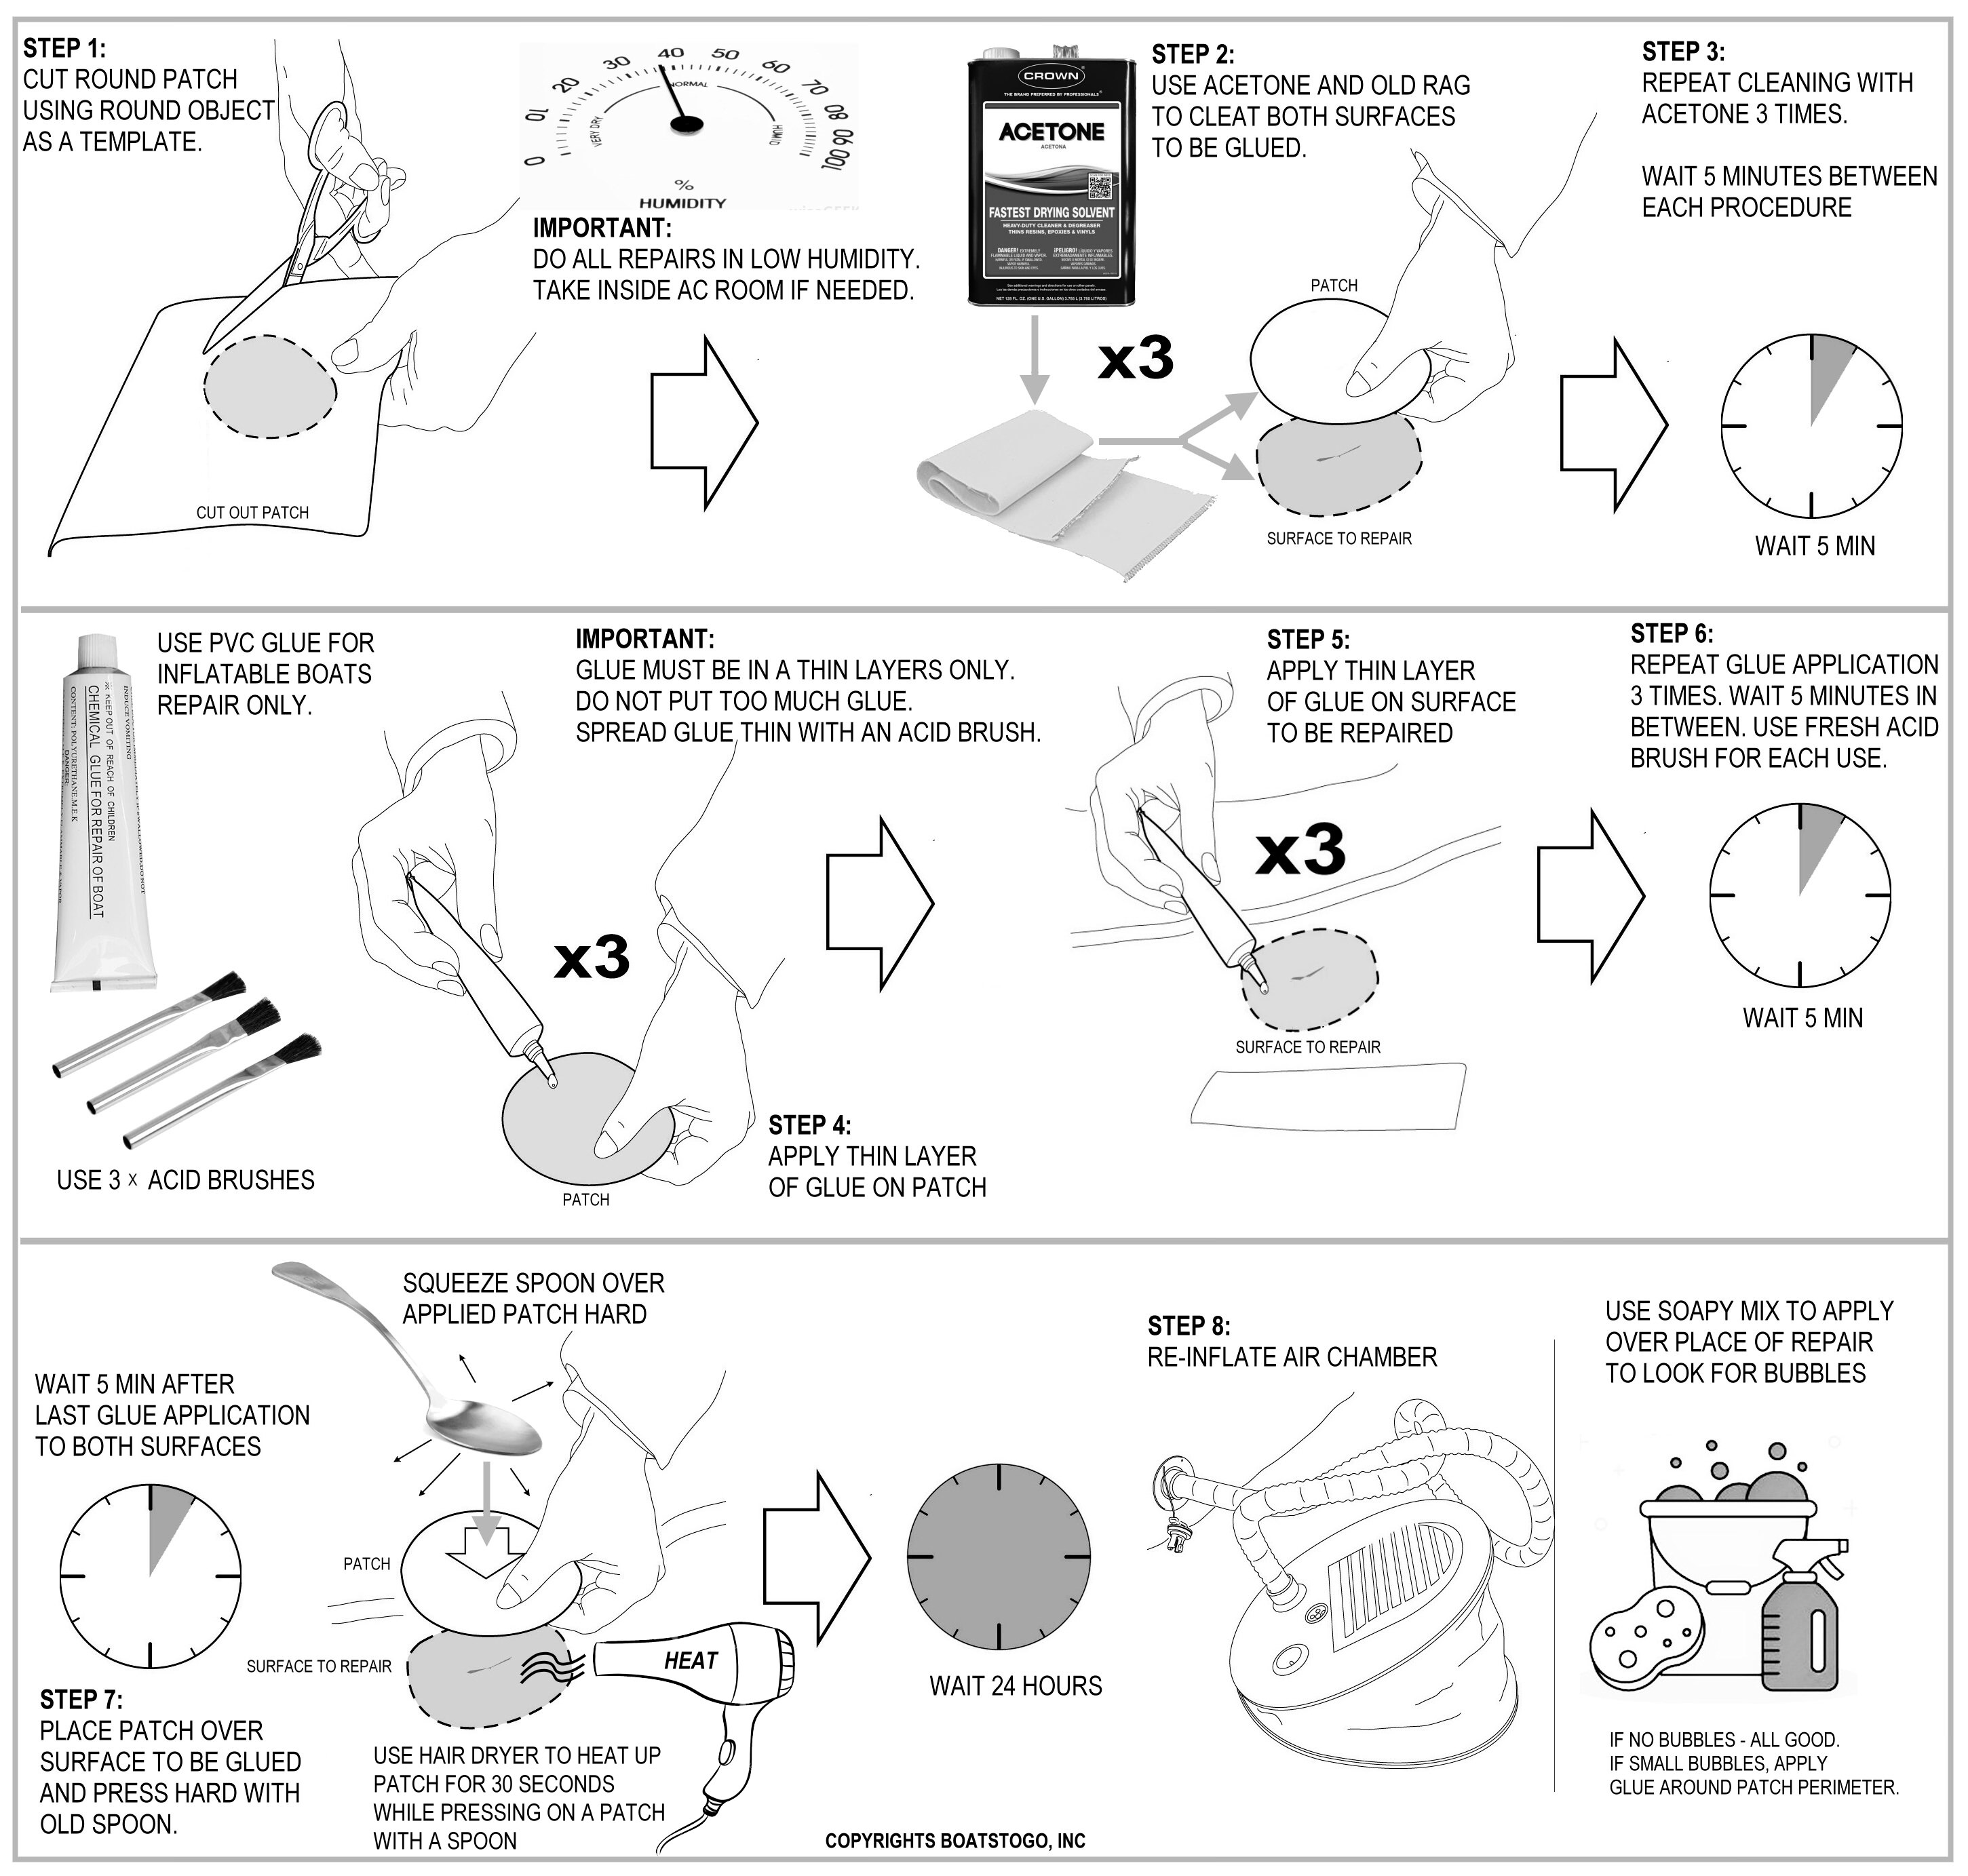
Your inflatable watercraft comes with a repair kit as standard equipment. Glue inside that kit can be used for repairs. It is a MUST to do repairs in a low humidity. Humidity above 50% will decrease glue bond. If it too humid outside, take inside AC room where humidity is lower.
Cut a piece of repair material large enough to overlap the damaged area by approximately 1" and round off the edges. Use cup or a dime to make nice round patch. Do not make ugly patches. Use same color fabric as what you are repairing.
Clean both patch and area to be repaired, or seam, with Acetone or MEK 3 times. Wait 5 minutes between applications. It is important to clean surfaces with Acetone or MEK, to remove any oils or residue that will prevent proper melting together.
Apply thin glue layer to the underside of the patch, and over the area to be repaired. Too much glue will often interfere with a proper repair. Glue for PVC repairs is not a layer in between two pieces of PVC fabric being glued. Glue does not get dry up and hold PVC together. Sole purpose of glue is to dissolve top layers of PVC, in order to melt them together. It is like a chemical welding. Glue is a strong solvent for PVC, liquefying very top layers, imitating heat welding. That is why it is important to avoid humidity, because higher content of water vapors in the air prevent proper melting together.
Allow adhesive to become tacky for 5 minutes, so that glue can work itself into top layers of PVC, dissolving them somewhat. Use roller or spoon to press hard on top of patch to push into repair area. Let dry for 24 hours. After the patch has dried, apply glue around the edges for a complete seal (dry 6 hours).
Tools.
It is highly recommended to use heat gun and a roller to increase welding bond. Heat up both surfaces before gluing together, and heat up top of repairs while applying pressure with roller. Heat will activate glue, increasing melting reaction, insuring much stronger bond together. In fact, heat guns are used at the factory at the time of assembly. Inexpensive heat gun can be purchased for $20 in local Ace Hardware, Home Depot, Wal-Mart or Amazon.
Where to get glue? Glue inside repair kit designed for PVC boats repairs. However, best glue is 2 part glue. You can find it on-line, for example Westmarine.com or NRS.com, just search for "inflatable boat glue" or "inflatable raft glue". Make sure it is for PVC, not Hypalon.
Glue can also be purchased on Amazon. Just search for "inflatable boat glue". For example HH-66 Vinyl Cement is good glue for boat repairs.
Heat welding.
Also, there is another method of PVC repairs, using heat welding method. Special air heat welding tools are sold on Amazon. Just search for "PVC heat welding" These tools varies in price, but generally designed to weld PVC by melting 2 top layers together, to form permanent bond. Example of using that type of tools for welding PVC can be found on YouTube. Just search for "PVC heat welding". Please test that method on PVC patches before actual repairs, because heat level and slow speed of movement required to properly melt PVC together.
Infographic on boat repairs:
Video Guides
Video - How To Use heat gun as glue accelerator.
Video - How To Install Patch.
Video - How To Fix Huge Cut In Inflatable Boat.
Video - How To Fix Leaking Valve.
Video - How To Stop Slow Seam Leak.
Video - How To Fix Big Seam Opening.
Video - How To Fix Slow Leak Using Sealant.
Video - How To Replace Valve including inside socket.
Search YouTube for more videos of inflatable boats repairs.
What to do if inflatable boat compartments become soft over time?
 All inflatable products, including dinghies, kayaks and rafts are tested at our factory. They are kept fully inflated for 48 hours after the SATURN logos are applied to the product tubes. Therefore, it is extremely unlikely that brand new inflatable products are leaking air right out of the box. If air is escaping rapidly from a valve when you inflate your product for the first time, then most likely you are not properly locking the air valve.
If you leave your boat fully inflated, come back in a couple days or weeks and the air chambers are soft, then there are only 3 possible reasons for that: micro puncture somewhere on a fabric surface, leaky air valve, and least likely is a leaky seams, which is definitely a warranty issue.
Please note, that since air chambers are separated by inner baffles, it is possible that air leak in one chamber will cause other chamber to become soft too.  In this case you will need to pinpoint which chamber is actually leaking air. To do that you will need to deflate other chambers, and inflate only one chamber at the time to the full air pressure, and then see if it will get soft overt time, or if you can find air bubbles anywhere with application of soapy water. If inflated chamber holding air good and no soapy bubbles are observed, then it mean that some other chamber can be compromised. Repeat same operation with different chambers until you will pinpoint leaking chamber.
If you suspect that a valve is the source of the slow leak, you can verify this by fully inflating the air chamber, closing the valve cover and applying a soapy water mixture around the valve housing and cover cap. Air may escape around the valve plastic body perimeter, cap body perimeter, or in the place where the string securing the valve cover cap enters the valve housing.
If air leak is very slow, it might be difficult to immediately detect air bubbles. Try to press on air chamber to increase pressure or leave for couple minutes. If valve is leaking, then you will see small bubbles forming in a place of air leak.
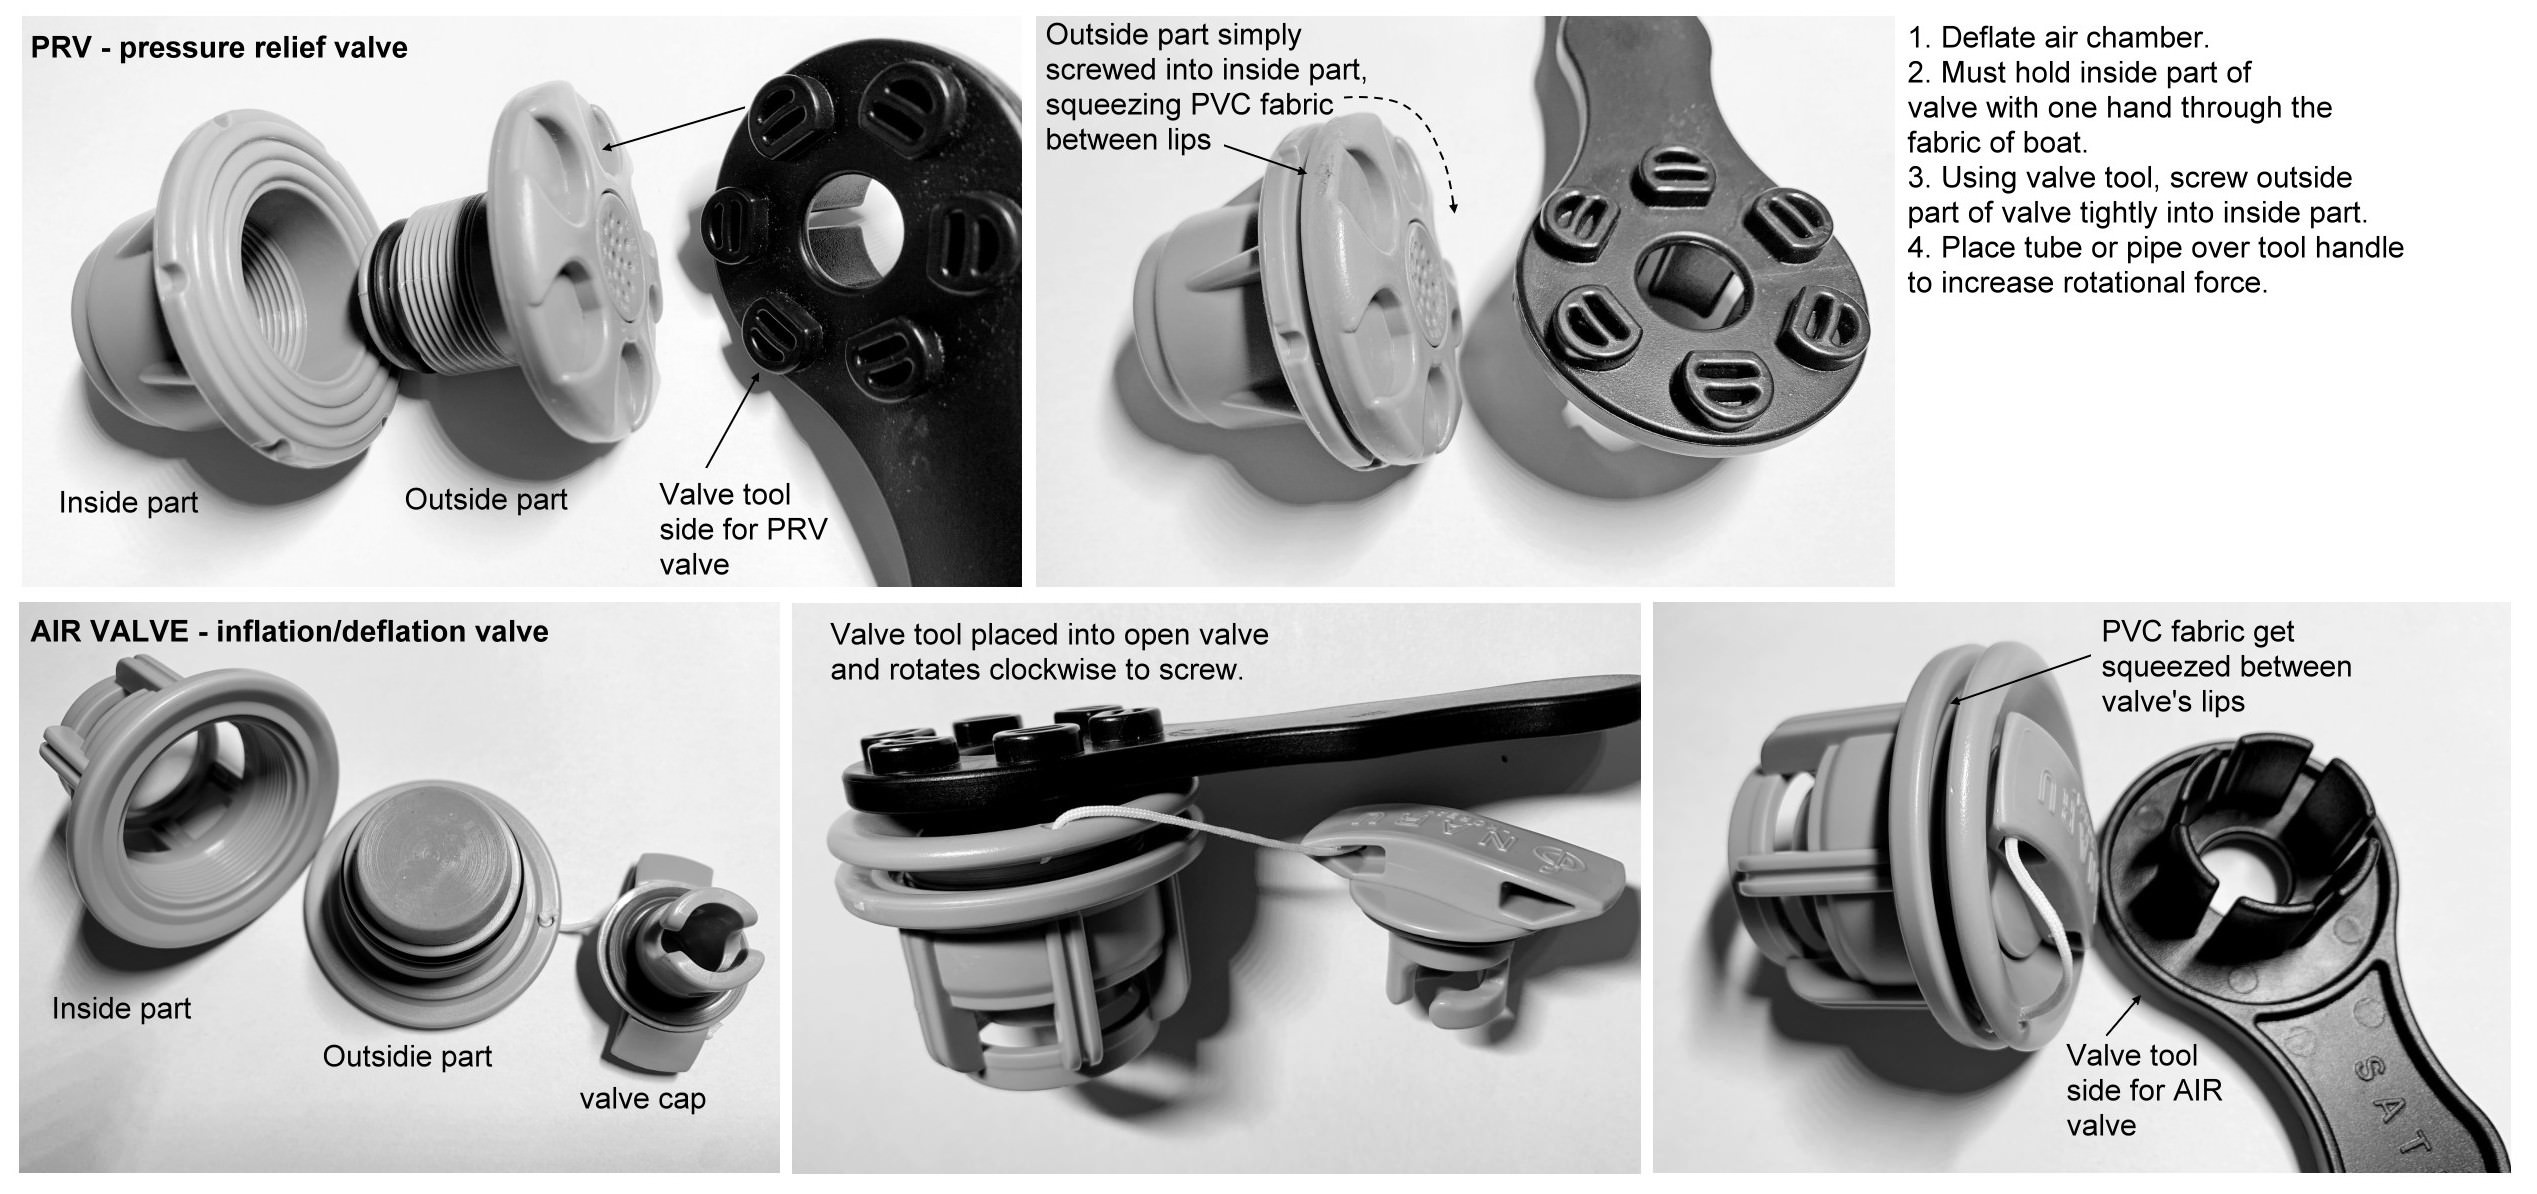
Over time, it is possible that debris, sand, dirt, oils and grime will accumulate on the rubber seal ring that is designed to keep the valve air tight. That may allow a small amount of air to slowly escape, making the tube and chambers soft. To remove debris you will need to blow air into the open valve with a hand pump while keeping the hose slightly away from valve's unlocked pushpin. It might be also possible to splash a bit of acetone inside the valve to clean off the dirt and grime. Leave the valve open to let the acetone evaporate. If that does not help, remove the valve with a special valve tool, clean the rubber seal with a cotton swab soaked in acetone and re-install the valve with a tight fit. If that does not help, then valve needs to be replaced.
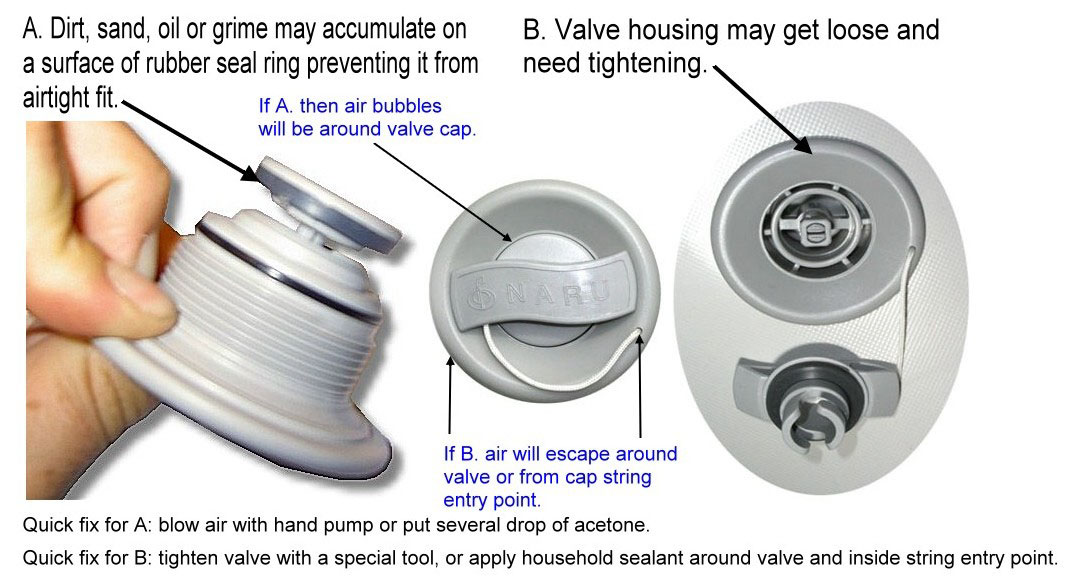
If you are observing air bubbles around the valve housing perimeter while applying a soapy mixture, there is a possibility that the valve needs to be tightened with a specialized valve tool. Such tools may be purchased or borrowed at https://www.BoatsToGo.com/valves.asp. It should also be included with your repair kit.
Leaking valves is common issue with any type or brand of inflatable boats, rafts and paddle boards. Just see these numerous YouTube videos showing how to tighten or replace air valve. That is why valve tool usually provided inside repair kit.
You can also quickly seal the slowly leaking air valve by applying a thin layer of glue around the valve housing perimeter, or putting a drop of glue inside the opening, where the string that secures the valve cover enters the valve housing, if you observe air bubbles at that particular place. Household silicone sealant may also be applied in place of the glue.
How to find difficult to locate leak on a surface. https://youtu.be/B9l0lcPk8ZY.
Click Play to see Videos how to replace air valve.