Questions & Answers
Frequently Asked Question (FAQ)
- How do I find and repair air leak on my inflatable boat?
- What to do if inflatable boat compartments become soft over time?
- What are the differences between drop stitch air and plywood floors?
- How to choose a right inflatable boat?
- What is differences between Hypalon and PVC fabric?
- How to assemble Plywood or Aluminum Floor for inflatable boat?
- What to do if inflatable boat gets accidentally punctured on the water?
- How long should I expect my Saturn inflatable boat to last?
- What documents are needed to register my inflatable boat?
- What to do if a hand pump arrives damaged?
- What to do if hand pump does not work?
- Can I use inflatable boat, kayak or KaBoat for fishing or spear fishing?
- What accessories come standard with Saturn inflatable boats?
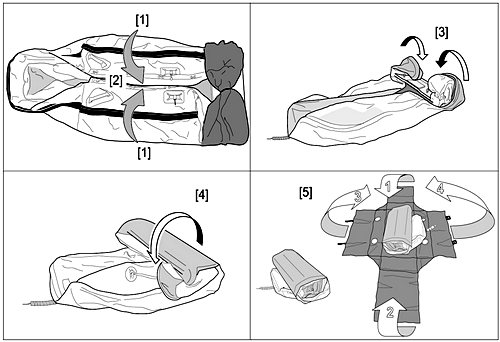
- How to fold inflatable boat for compact storage?
- Do I need to install a hydrofoil on the outboard motor for inflatable dingy?
- How to protect air floors from accidental punctures or sharp dog claws?
- How to properly tow inflatable dinghy behind a sailboat or yacht?
- How can I prevent the outboard motor from damaging the transom while transporting my boat on a trailer?
- Can I pump up my inflatable boat using electric pump only?
- How Saturn inflatable boats are different from other brands?
- What type of outboard motor can be installed on a Saturn inflatable boat?
- Are Saturn inflatable boats certified or approved?
- How to properly operate inflatable boat air valve.
- How do I replace the air valve in my inflatable boat, kayak or raft?
- What outboard motor do I need to put inflatable boat on plane?
- What are the steps to correctly assemble inflatable boat with hard floor?
- What is the working air pressure, and do I need a pressure gauge?
- How do I tie up my inflatable dinghy boat to the dock?
- How to make inflatable boat seat bench to be softer on a bumpy rides?
- How to make swim ladder to get into inflatable boat from the water?
- How to properly load inflatable boat?
- Where do I get a Bill of Sale and Manufacturer Certificate Of Origin in order to register my boat?
- The keel tube under the floor is skewed to one side. How to fix it?
- How to fix cavitation in inflatable boat or dinghy?
- How can you avoid slipping in the boat seat while the boat is in motion?
- What to do if water slowly leaking into inflatable boat?
- How to minimize pressure on seat bench by heavy person?
- Can inflatable boat be fixed if it get a really big cut?
- How to set up trailer for inflatable boat?
- How to quickly make valve replacement tool out of PVC pipe?
- How to install foldable fishing chairs on inflatable boat aluminum benches?
- How to install registration numbers on an inflatable boat?
- Why my hard aluminum floor inside boat had developed cracks in side rails or bended?
- What is that stitching on a bottom of boat where floor attached to tubes?
- How to store inflatable boat, load in a car and move around?
- What does Pre Order means? How Pre Orders work?
- What is difference between SATURN and SATURN TRITON?
 How do I find and repair air leak in an inflatable boat, kayak or raft?
 If your inflatable watercraft losing air pressure, (aside from air pressure loss commonly caused by colder temperatures), then air must to escape somewhere, at some location, in order for air chamber(s) to become soft.
The best tool to find air leaks is a soap, shampoo or dish detergent, mixed with water in a spray bottle or bucket. Also great is kids bubble solution, as it created strongest bubbles.
1. Start by checking air valves first. Remember, the number one cause of slow leaks is due to poorly fitted valves, which simply might need more tightening. Fully inflate air chamber to max air pressure. Then spray soapy mix around the air valve on a suspected air chamber. Or, use large brush or rag to apply soapy mix all over valve location. Make sure that valve cap is closed. If you see bubbles forming, check your valve fitting and base and be sure the valve insert is screwed on tight and pushpin is in correct position. See FAQ below for more help with leaky air valves. Usually, it is easiest fix that does not require valve replacement, or any type of patching.
2. If no bubbles visible on or around air valves, then check fabric seams on your inflatable. Spray or apply soapy mix with brush all along seams. Give few minutes, and then check for bubbles forming along the seam lines. Use flash light to spot along seams to detect any suspicious movement of bubbles. Sometime leak can be so slow that bubbles barely visible. If seam produces no bubbles at all, then issue is not with a seam, but with a surface puncture.
3. To find tiny, difficult to spot air leaks on a boat surface, fully inflate the boat until it's hard to the touch. Put some liquid detergent in a bucket of water and scrub it all over the chamber surface with rag, towel or big wash brush. Watch for tiny bubbles. When you find the first leak, mark with tape, and keep looking, as there could be more than one. Please see below for fixing small punctures.
If you have no luck finding a slow leak with air bubbles, then inflate the boat to its maximum air pressure and try to listen for the leak. If you can narrow the area down, return with a spray bottle to identify the source of the leak. Also, see below video of method to locate hard to sport leaks with a clinging food plastic wrap.
Do not try to spray soapy mix all over the boat, because it will be difficult to spot bubble location. Divide air chamber surface into imaginary squares, and apply soapy mix to that square and then look against surface to see for bubbles. If no bubbles are appears after 5-10 minutes, then move to another square.
If all above methods failed, last thing you can try is to submerge sections of inflatable chamber under water and look for bubbles that way. Chamber can be partially inflated for that method.
Repair Methods Overview:
Punctures less than 1/8" in size can be repaired simply without a patch. Deflate your boat, then clean and dry the area to be repaired. If available, use Acetone or MEK for cleaning of area. Apply a small drop of glue from repair kit to cover the puncture, and let dry for 24 hours. If you need to get on the water sooner, let dry for 30 minutes and then inflate the air chamber, inflating the compartment with the repair only 3/4 full. This repair might not be permanent so add a drop again at a later date to make it permanent.
Below repair method applies to accidental puncture patches, unglued seams repairs or re-gluing accessories or any type of add-ons.
Keep in mind that whole inflatable watercraft, including all seams, and air floor seams, and transom if any, all attachments, D-rings, etc, absolutely everything you see in front of you, has been glued together, seam-by-seam, by human hands at the factory. If they can do it, you can do it too! Statements like: “Oh… I tried to put patch, and it does not hold” is not acceptable. There is no magic, voodoo or space science involved in gluing seam or a patch. There is however few tricks of the trade that do exist. If you do everything correctly, then repairs MUST hold for years.
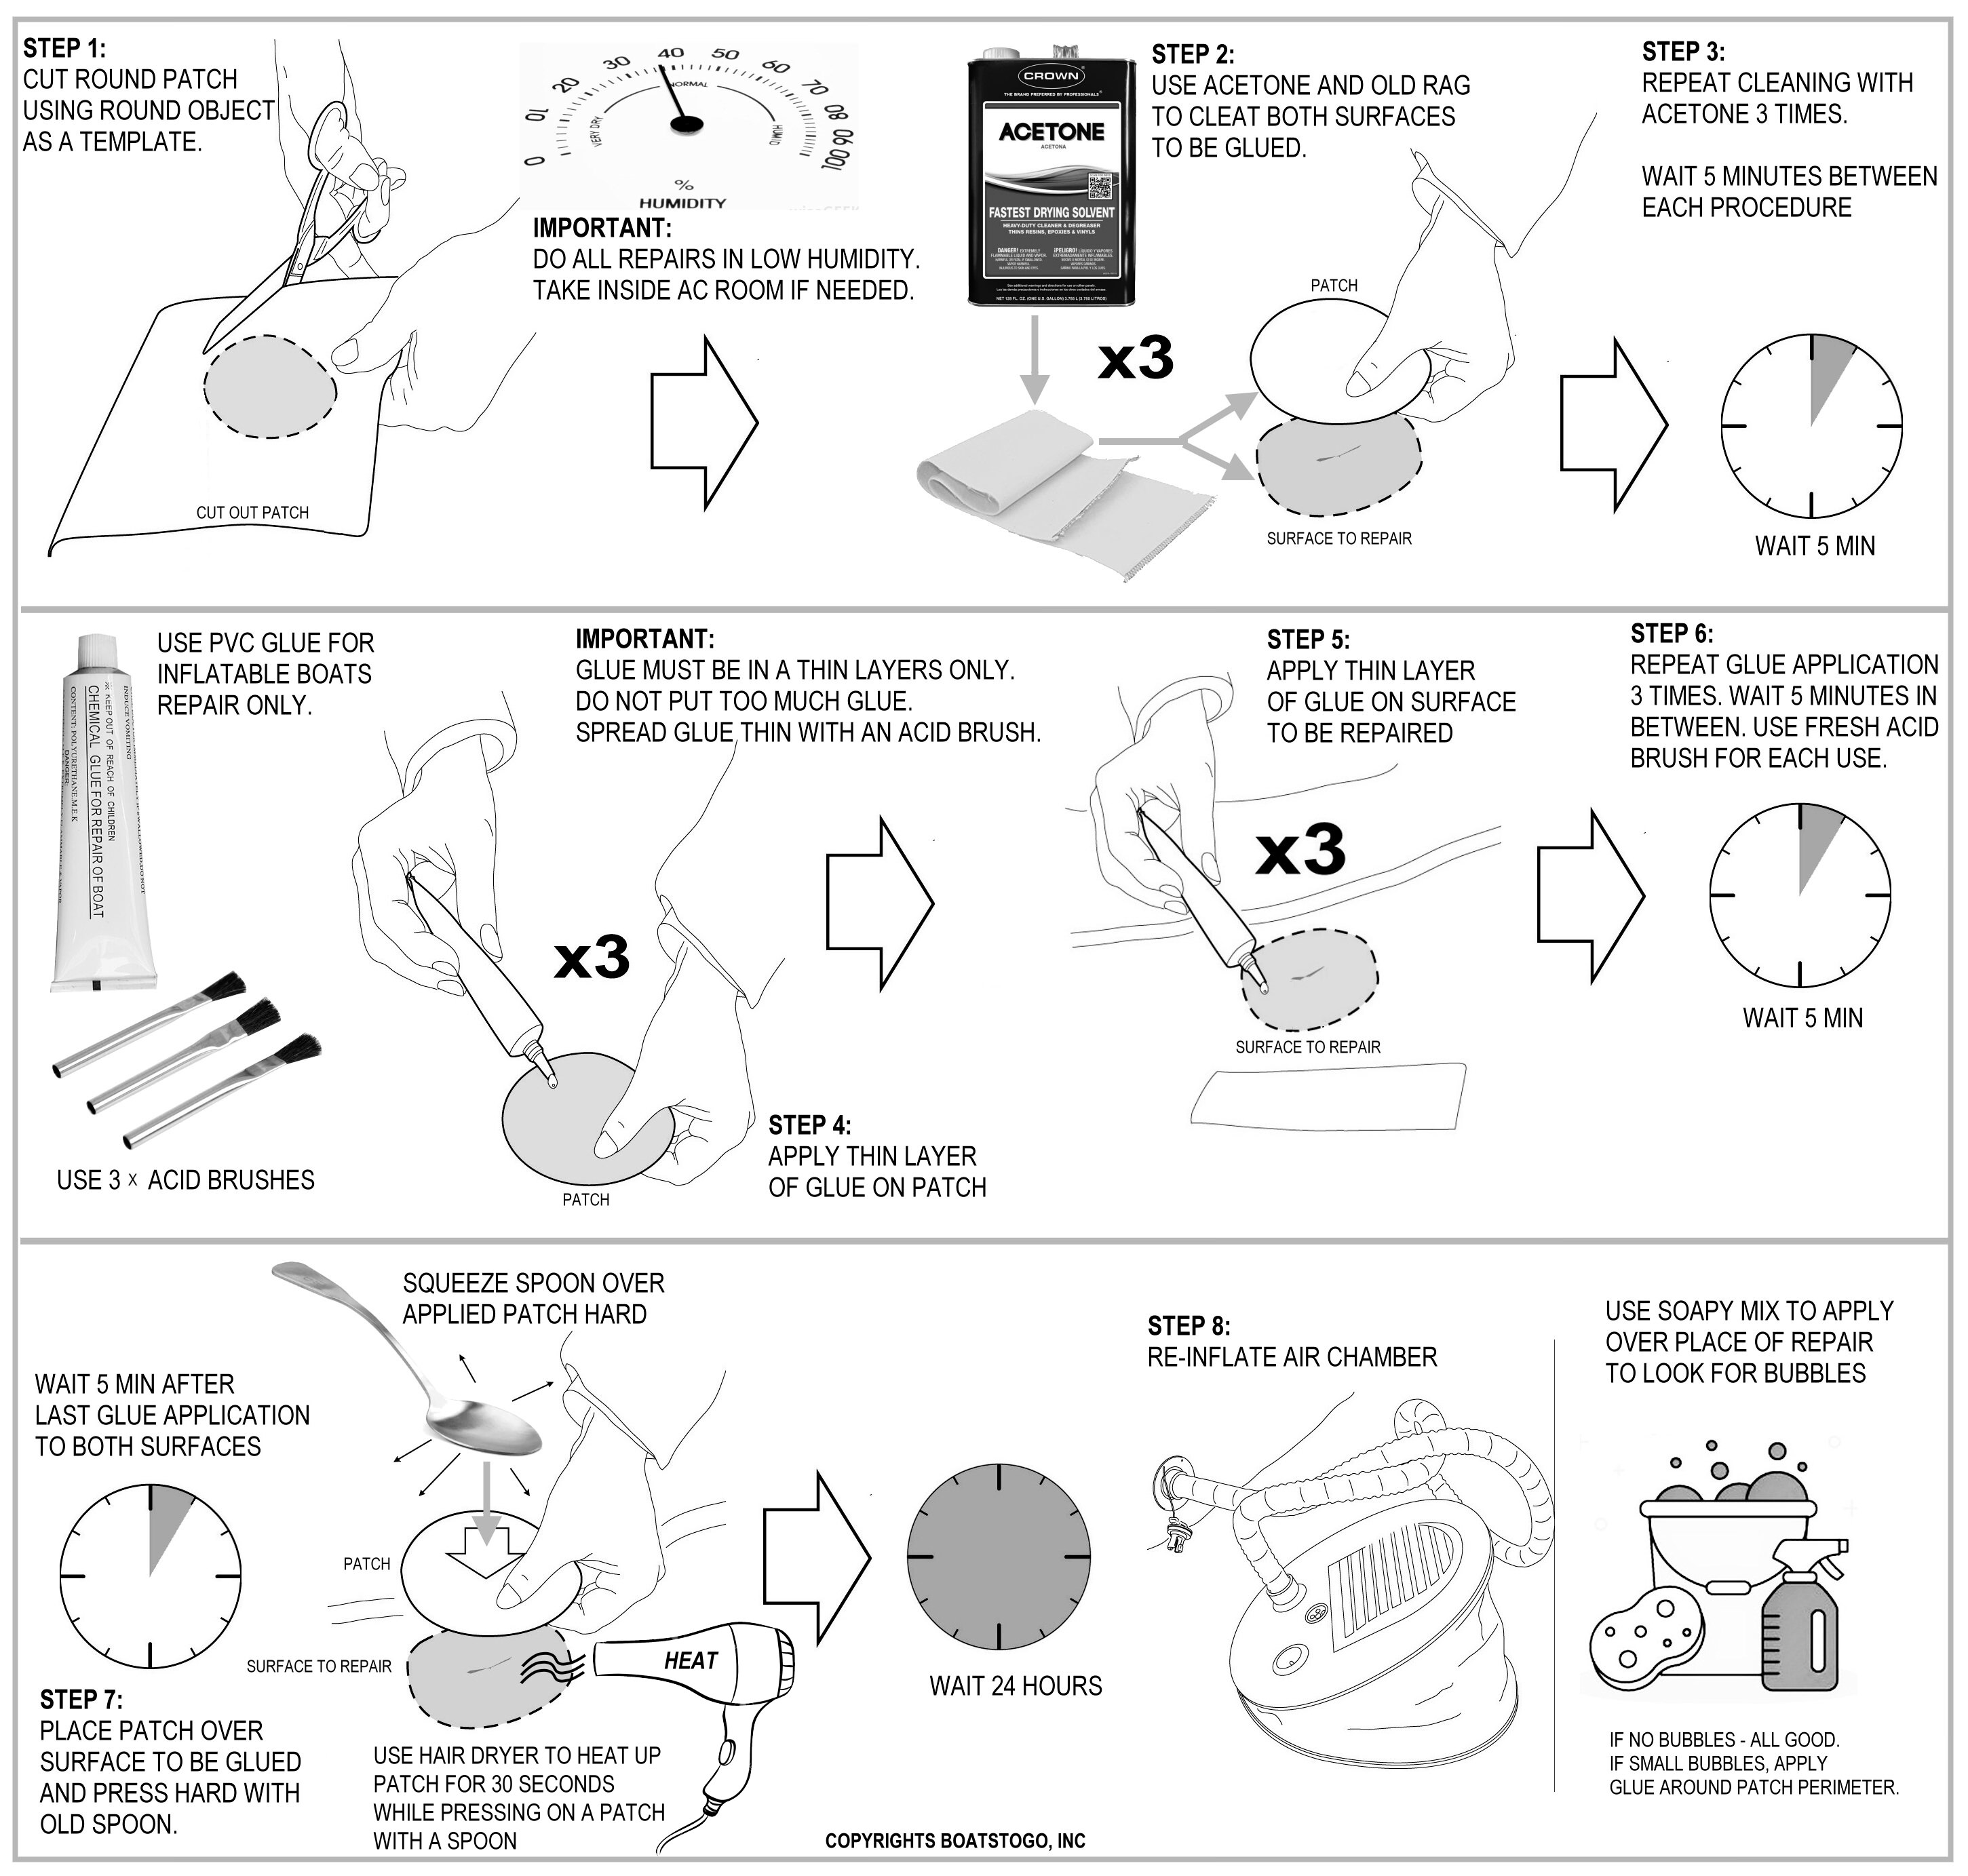
Your inflatable watercraft comes with a repair kit as standard equipment. Glue inside that kit can be used for repairs. It is a MUST to do repairs in a low humidity. Humidity above 50% will decrease glue bond. If it too humid outside, take inside AC room where humidity is lower.
Cut a piece of repair material large enough to overlap the damaged area by approximately 1" and round off the edges. Use cup or a dime to make nice round patch. Do not make ugly patches. Use same color fabric as what you are repairing.
Clean both patch and area to be repaired, or seam, with Acetone or MEK 3 times. Wait 5 minutes between applications. It is important to clean surfaces with Acetone or MEK, to remove any oils or residue that will prevent proper melting together.
Apply thin glue layer to the underside of the patch, and over the area to be repaired. Too much glue will often interfere with a proper repair. Glue for PVC repairs is not a layer in between two pieces of PVC fabric being glued. Glue does not get dry up and hold PVC together. Sole purpose of glue is to dissolve top layers of PVC, in order to melt them together. It is like a chemical welding. Glue is a strong solvent for PVC, liquefying very top layers, imitating heat welding. That is why it is important to avoid humidity, because higher content of water vapors in the air prevent proper melting together.
Allow adhesive to become tacky for 5 minutes, so that glue can work itself into top layers of PVC, dissolving them somewhat. Use roller or spoon to press hard on top of patch to push into repair area. Let dry for 24 hours. After the patch has dried, apply glue around the edges for a complete seal (dry 6 hours).
It is highly recommended to use heat gun and a roller to increase welding bond. Heat up both surfaces before gluing together, and heat up top of repairs while applying pressure with roller. Heat will activate glue, increasing melting reaction, insuring much stronger bond together. In fact, heat guns are used at the factory at the time of assembly. Inexpensive heat gun can be purchased for $20 in local Ace Hardware, Home Depot, Wal-Mart or Amazon.
Where to get glue? Glue inside repair kit designed for PVC boats repairs. However, best glue is 2 part glue. You can find it on-line, for example Westmarine.com or NRS.com, just search for "inflatable boat glue" or "inflatable raft glue". Make sure it is for PVC, not Hypalon.
Glue can also be purchased on Amazon. Just search for "inflatable boat glue". For example HH-66 Vinyl Cement is good glue for boat repairs.
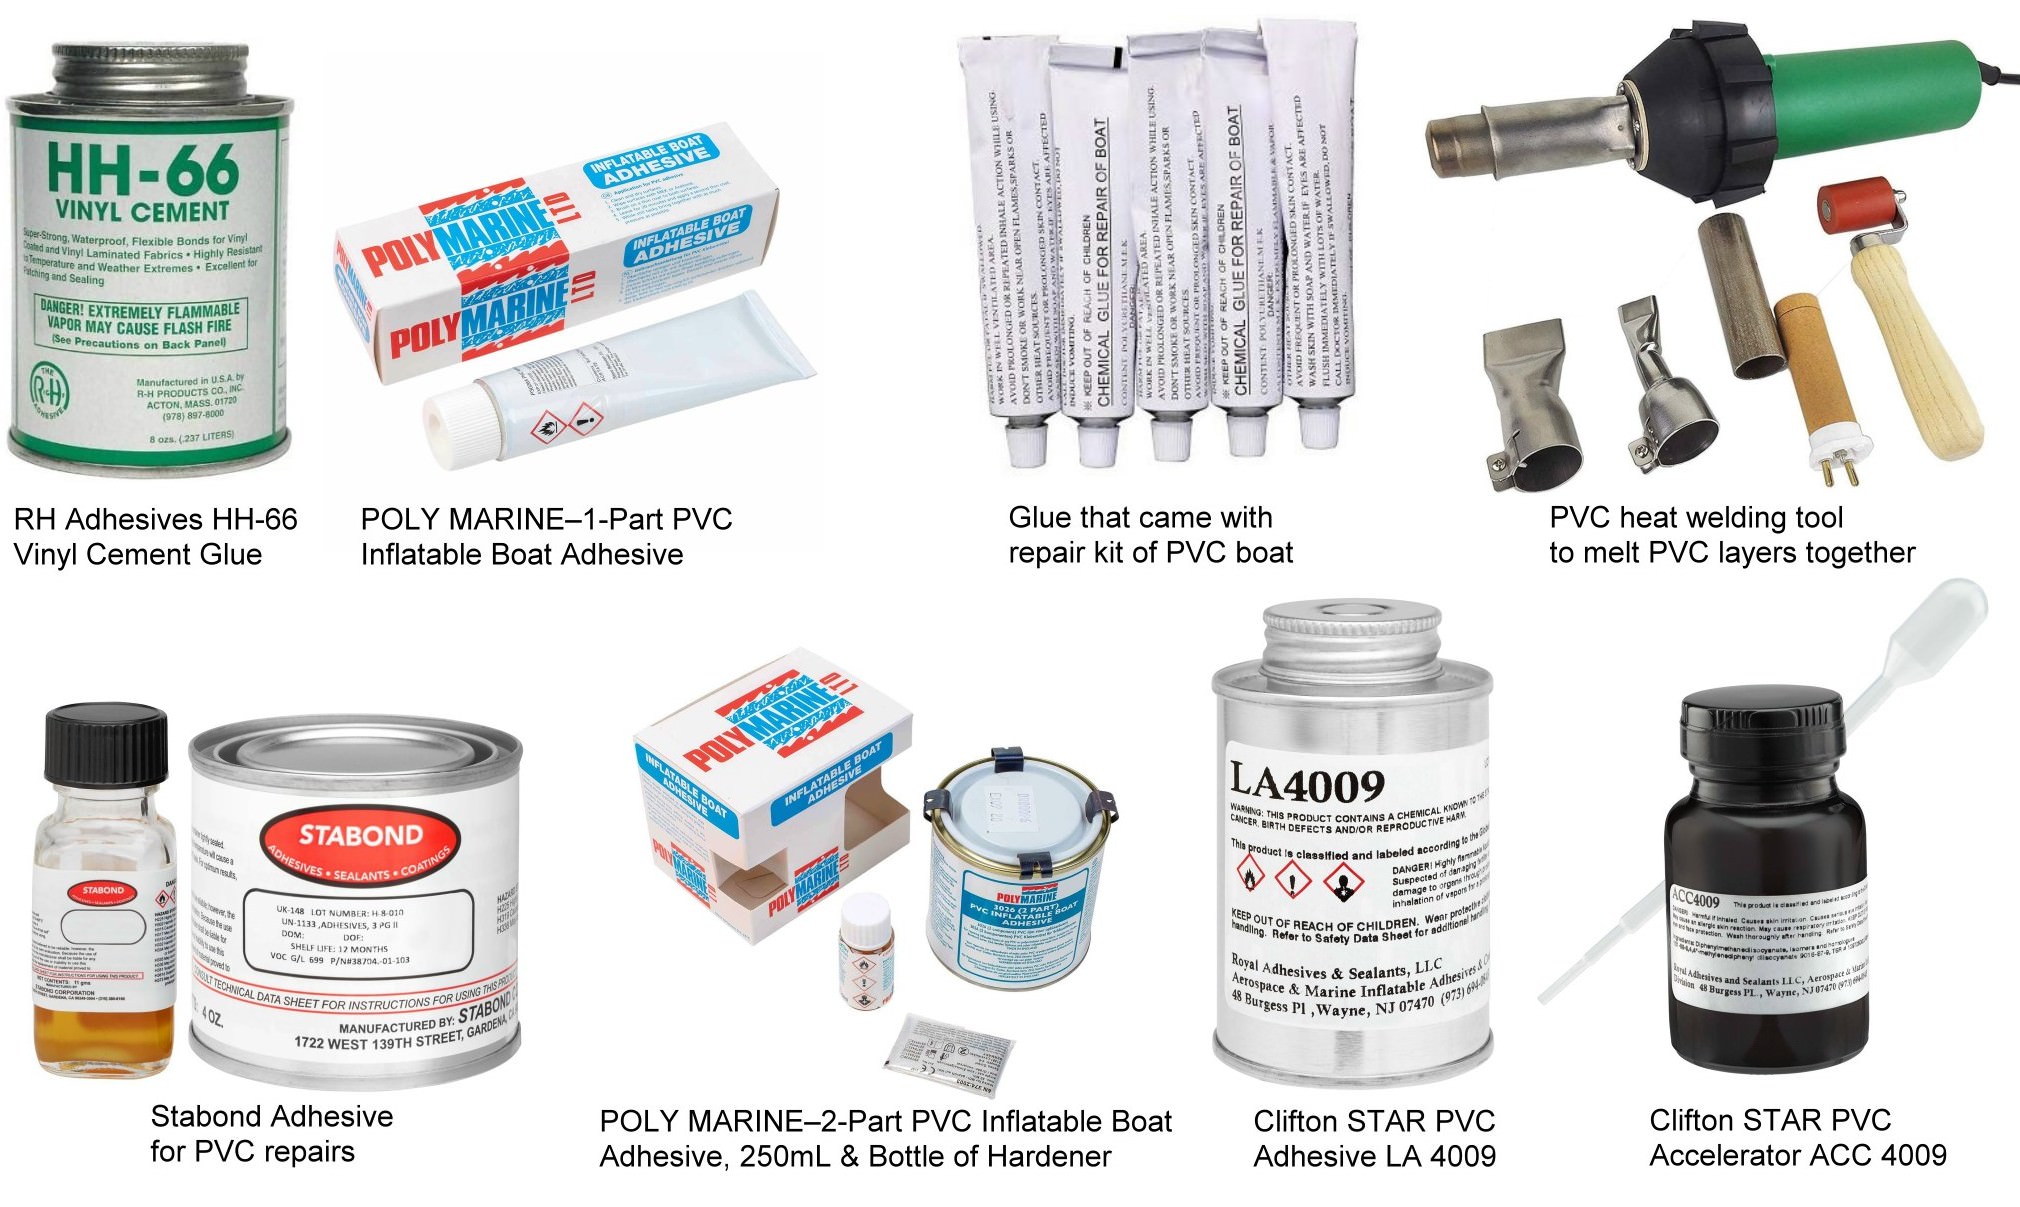
Also, there is another method of PVC repairs, using heat welding method. Special air heat welding tools are sold on Amazon. Just search for "PVC heat welding" These tools varies in price, but generally designed to weld PVC by melting 2 top layers together, to form permanent bond. Example of using that type of tools for welding PVC can be found on YouTube. Just search for "PVC heat welding". Please test that method on PVC patches before actual repairs, because heat level and slow speed of movement required to properly melt PVC together.
Please see below Infographic on boat repairs:
Video - How To Use heat gun as glue accelerator.
Video - How To Install Patch.
Video - How To Fix Huge Cut In Inflatable Boat.
Video - How To Fix Leaking Valve.
Video - How To Stop Slow Seam Leak.
Video - How To Fix Big Seam Opening.
Video - How To Fix Slow Leak Using Sealant.
Video - How To Replace Valve including inside socket.
Search YouTube for more videos of inflatable boats repairs.
What to do if inflatable boat compartments become soft over time?
All inflatable products, including dinghies, kayaks and rafts are tested at our factory. They are kept fully inflated for 48 hours after the SATURN logos are applied to the product tubes. Therefore, it is extremely unlikely that brand new inflatable products are leaking air right out of the box. If air is escaping rapidly from a valve when you inflate your product for the first time, then most likely you are not properly locking the air valve.
If you leave your boat fully inflated, come back in a couple
days or weeks and the air chambers are soft, then there are
only 3 possible reasons for that: micro puncture somewhere on
a fabric surface, leaky air valve, and least likely is a leaky
seams, which is definitely a warranty issue.
Please note, that since air
chambers are separated by inner baffles, it is possible that
air leak in one chamber will cause other chamber to become
soft too.
 In
this case you will need to pinpoint which chamber is actually
leaking air. To do that you will need to deflate other
chambers, and inflate only one chamber at the time to the full
air pressure, and then see if it will get soft overt time, or
if you can find air bubbles anywhere with application of soapy
water. If inflated chamber holding air good and no soapy
bubbles are observed, then it mean that some other chamber can
be compromised. Repeat same operation with different chambers until
you will pinpoint leaking chamber.
In
this case you will need to pinpoint which chamber is actually
leaking air. To do that you will need to deflate other
chambers, and inflate only one chamber at the time to the full
air pressure, and then see if it will get soft overt time, or
if you can find air bubbles anywhere with application of soapy
water. If inflated chamber holding air good and no soapy
bubbles are observed, then it mean that some other chamber can
be compromised. Repeat same operation with different chambers until
you will pinpoint leaking chamber.
If you suspect that a valve is the source of the slow leak, you can verify this by fully inflating the air chamber, closing the valve cover and applying a soapy water mixture around the valve housing and cover cap. Air may escape around the valve
plastic body perimeter, cap body perimeter, or in the place where the string securing the valve cover cap enters the valve housing.
If air leak is very slow, it
might be difficult to immediately detect air bubbles. Try to
press on air chamber to increase pressure or leave for couple
minutes. If valve is leaking, then you will see small bubbles
forming in a place of air leak.
Over time, it is possible that debris, sand, dirt, oils and grime will accumulate on the rubber seal ring that is designed to keep the valve air tight. That may allow a small amount of air to slowly escape, making the tube and chambers soft. To remove debris you will need to blow air into the open valve with a hand pump while keeping the hose slightly away from valve's unlocked pushpin. It might be also possible to splash a bit of acetone inside the valve to clean off the dirt and grime. Leave the valve open to let the acetone evaporate. If that does not help, remove the valve with a special valve tool, clean the rubber seal with a cotton swab soaked in acetone and re-install the valve with a tight fit. If that does not help, then valve needs to be replaced.
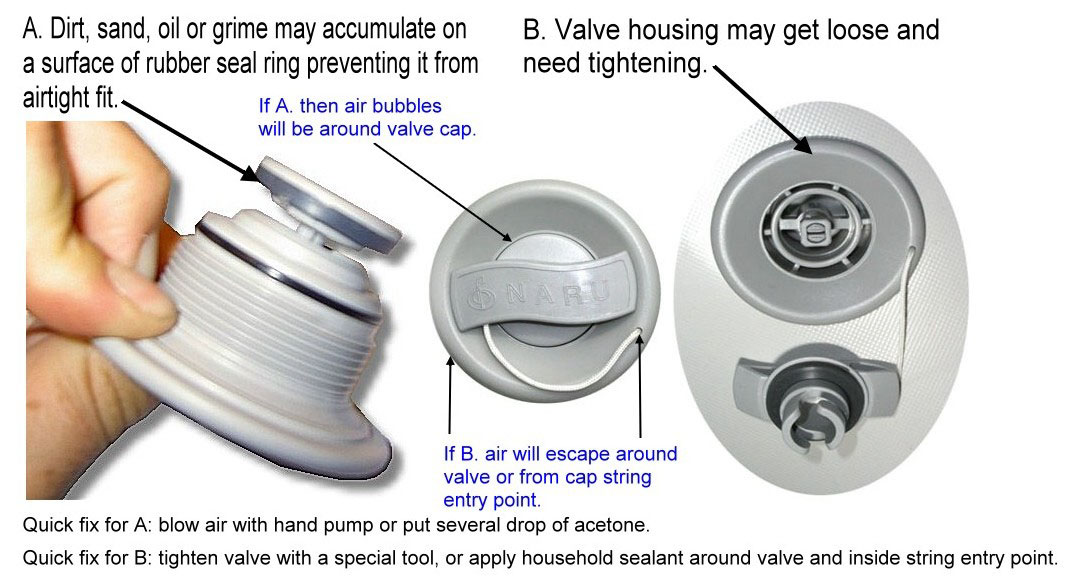
If you are observing air bubbles around the valve housing perimeter while applying a soapy mixture, there is a possibility that the valve needs to be tightened with a specialized valve tool. Such tools may be purchased or borrowed at https://www.BoatsToGo.com/valves.asp. It should also be included with your repair kit.
Leaking valves is common issue with any type or brand of inflatable boats, rafts and paddle boards. Just see these numerous YouTube videos showing how to tighten or replace air valve. That is why valve tool usually provided inside repair kit.
You can also quickly seal the slowly leaking air valve by applying a thin layer of glue around the valve housing perimeter, or putting a drop of glue inside the opening, where the string that secures the valve cover enters the valve housing, if you observe air bubbles at that particular place. Household silicone sealant may also be applied in place of the glue.
How to find difficult to locate leak on a surface. https://youtu.be/B9l0lcPk8ZY.
Click Play to see Videos how to replace air valve.
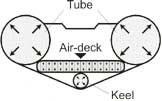
What are the differences between drop stitch
air and plywood or aluminum floors?
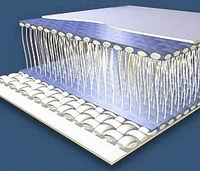 Once
inflated, a high pressure air floor becomes as rigid as a
plywood floor. You can stand, walk or even jump on it, the
same way you could on plywood floor.
Once
inflated, a high pressure air floor becomes as rigid as a
plywood floor. You can stand, walk or even jump on it, the
same way you could on plywood floor.
If you are planning to inflate and deflate your boat often, then the air floor is your best solution, because the boat folds compactly. It's a breeze to assemble and inflatable boats with air floor. Just roll out-and inflate.
Assembling a plywood floor is a little bit of a hassle, and therefore we recommend plywood floors only if you keep the boat inflated most of the time. Another advantage of an air floor is that it is much lighter then a plywood floor. Due to it's lighter weight, the boat can achieve a higher speed much easier then with a plywood floor. Plus, an air floor is easy on your knees and absorbs vibrations better then a plywood floor. Because of these outstanding features, most of our customers prefer boats with air floors.
Customer's video comparing High Pressure Air Floor to Hard Sectional Aluminum Floor.
|
All of our air floors come with a plywood support above the keel in the bow section of the boat. Because of these patented features, air floors become very rigid and flat. Flat floors perform much better then bended air floors of some competing brands. | 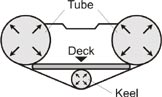
|
| Air Floors | 
|
as rigid as |
|
Plywood floors |
How to choose a right inflatable boat?
Please see all technical specifications for
Saturn inflatable boats at
https://www.BoatsToGo.com/inflatable_boats.asp.
Max persons capacity displays how many persons the boat can transport safely. In general, to be comfortable on
an inflatable
boat, you will need to deduct 1-2 persons from the max boat
capacity. For example, SD260's will comfortably seat 1-2
people, SD290/330's 2-3 people, SD365/385 3-4 people;
SD430's will accommodate 4-5 people comfortable.
It is much easier to inflate and deflate boats with high-pressure air deck floors than boats with plywood floors or hard floors. It takes more time and skill to assemble plywood floor. In general, if you are planning to inflate/deflate the boat often, then select a boat with an air floor. If you keep the boat fully inflated for at least 1-3 weeks then choose a boat a with plywood or hard floor. If you keep boat on a trailer or in a dock, then a hard floor will not be a problem for you. If you keep the boat in the car's trunk and inflate it for only a day of fishing, then you will find it easier to deal with an air deck floor.
|
Selection recommendation charge based on intended activity: |
|||||
| inflatable kayak | inflatable boat 7-9' | inflatable boat 11-12' | inflatable boat 13-15' | inflatable river raft | |
| Yacht Tender | fair | excellent | good | good | |
| Exploring Harbors & Bays | good | good | good | excellent | |
| Coastal Areas Exploration | fair | fair | excellent | excellent | |
| Beach Cruising & Camping | excellent | fair | good | excellent | |
| Scuba In Shore | good | good | excellent | fair | |
| Scuba Off Shore | good | excellent | |||
| Fishing Ponds & Streams | good | excellent | fair | fair | fair |
| Fishing Lakes & Rivers | good | excellent | good | excellent | good |
| Saltwater Game Fishing | good | excellent | |||
| Duck Hunting | good | excellent | |||
| River Rafting | excellent | good | fair | fair | excellent |
| Lifesaving | good | good | good | ||
| Splashing around | excellent | fair | fair | fair | |
What is differences between Hypalon and PVC fabric?
There are two main types of fabric that
most inflatable boats are made of. They are either PVC or Hypalon. Most
Mercury, Sea Eagle and Zodiac inflatable boats are made of PVC.
Caribe, AB and Achilles inflatable boats were made of Hypalon
in past. However Hypalon was discontinued by its manufacturer
Dupont, and now it is sold under different name CSM.
PVC
Pro - Significantly less expensive then Hypalon.
Con - Won't last as long in the direct sunlight as Hypalon before it starts to
fade out (if left unprotected). Does not tolerate sunscreen
and insect repellent as well as Hypalon.
Hypalon or CSM
Pro - Will last significantly longer than PVC when exposed to prolonged periods of direct sunlight.
Will tolerate fuel spills, sunscreen, insect repellent, and exhaust fumes better than PVC.
Con - Significantly more expensive then PVC.
In general PVC fabric won't last as long as Hypalon fabric if the boat will be subjected to prolonged periods of direct sunlight and no measures have been taken to protect the PVC fabric from the sun (i.e. boat cover or UV protectant). After a number of years in direct sunlight the PVC fabric will become
sticky and fade out.
Exposure of PVC inflatable boat to direct sunlight is not a problem unless your boat is going to be outside and unprotected all
year long. If you only use the boat occasionally such as on weekends or while on vacation then it isn't a factor at all. Even if you leave your boat outside all the time the issue can be solved
simply by putting a boat cover or piece of tarp over your boat when it
is not in use.
 How to assemble Plywood or Aluminum Floor for inflatable boat?
 Please visit the Hard Floor Assembly page if you have difficulties installing your plywood floor into your inflatable boat. You may also download a Plywood Floor Assembly manual.
What to do if inflatable boat gets accidentally punctured on the water?
First of all - do not panic. Most inflatable boats, rafts
and kayaks have several
air chambers, and if one of chambers gets punctured, the boat will
stay afloat due to the buoyancy of the remaining air
chambers.
 Inflatable
air chambers are separated by internal baffles that keep chambers separate in
case of accidental puncture, and designed to equalize air pressure between all
interconnected chambers.
Inflatable
air chambers are separated by internal baffles that keep chambers separate in
case of accidental puncture, and designed to equalize air pressure between all
interconnected chambers.
We suggest that you always carry on board the following items - Personal Flotation Device (PFD) for each passenger along with a whistle, a marine emergency radio to call the Coast Guard for help if necessary, a hand pump, piece of duct tape (Gorilla Tape) and a small bottle of acetone.
If boat gets punctured below the water line, there is nothing much you can do except for pumping air with a hand pump in order to slow down the air leak. For quick emergency repairs in ripped inflatables, you can purchase a ClamSeal.
Punctures in accessible places, inside the boat, can be temporarily fixed with a piece of duct or Gorilla tape. To insure a good seal, the area around the puncture should be cleaned with acetone before applying duct tape. After that, you can pump in air to slow down the escaping air, and get ashore as soon as possible.
How long should I expect my
Saturn inflatable boat to last?
That is totally up to you. If you take good care of your
boat, it may last 5-10 years. If you do not take proper care
of the boat, it will
only last up to its warranty period. However, abused and mishandled
boats are not covered by the warranty.
When not in use, it is highly recommended to store PVC inflatable products in a well ventilated, shaded area. Humidity and heat are killers for PVC glue used in the assembly of inflatable boats. Do NOT store PVC inflatables in closed containers, boxes or storage areas with no ventilation and under direct sunlight. Humidity will accumulate in tightly closed storage areas and will weaken the chemical bond of PVC glue once significant heat is present.
To extend the lifetime of your boat by taking proper care of it, we are recommending following book: " INFLATABLE BOATS - Selection, Care, Repair, and Seamanship " by Jim Trefethen. ISBN number 0-07-065252-X. Available at www.amazon.com, or you may order it from the publisher: The McGraw-Hill Companies, 1-800-262-4729.
It is well known that the most common reason for premature boat aging is exposure to the sun and its damaging UV rays. Fabric discoloration, fading, breakdowns and damages to varnished plywood can be all attributed to direct sun exposure.
 The
solution
is simple - when the boat is not in use, cover it or deflate
it. There
are plenty of Inflatables rotting under the damaging sun in
any local marine or harbor. If possible, deflate the boat,
clean it and store it in its carry bag.
The
solution
is simple - when the boat is not in use, cover it or deflate
it. There
are plenty of Inflatables rotting under the damaging sun in
any local marine or harbor. If possible, deflate the boat,
clean it and store it in its carry bag.
 If the boat is constantly
dragged behind your sailboat, left year round on a dock, or
left dirty and directly under harmful UV-rays, you can't
expect it to last forever. If you use a
boat
cover
, or at least cover boat with a piece of tarp, your SATURN will last much longer.
If the boat is constantly
dragged behind your sailboat, left year round on a dock, or
left dirty and directly under harmful UV-rays, you can't
expect it to last forever. If you use a
boat
cover
, or at least cover boat with a piece of tarp, your SATURN will last much longer.
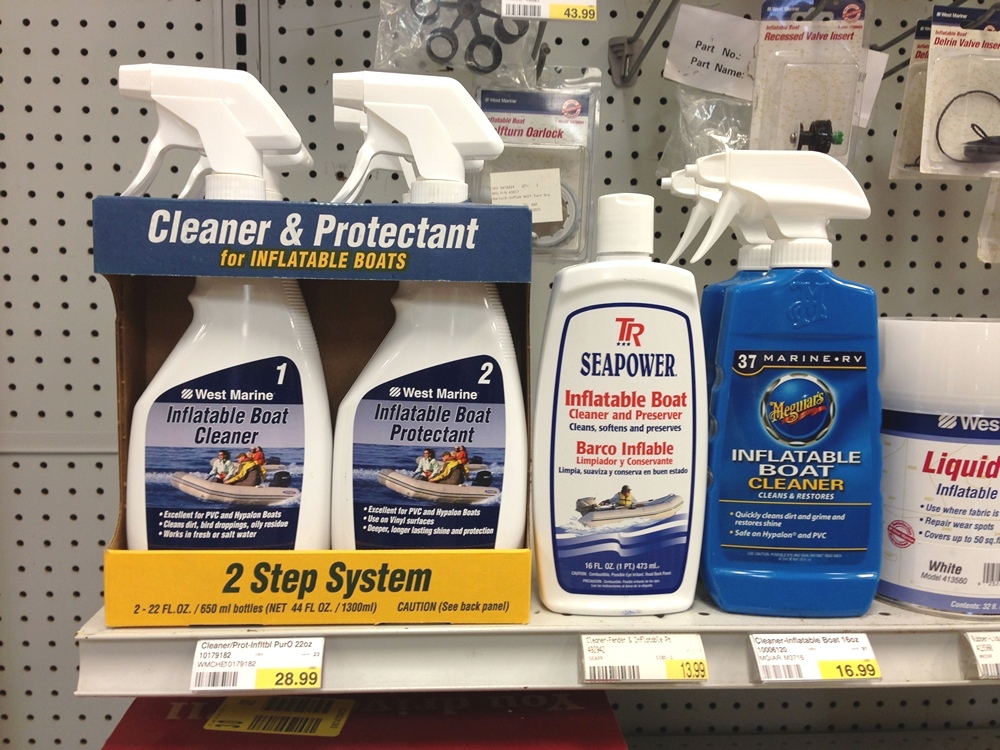
Try to keep the boat clean and free of chemical detergents and sun screen lotions that may discolor the fabric. We highly recommend boat cleaners available at the Inland Marine USA web site.
 Please use ONLY cleaning solutions that are approved for
PVC fabrics. Do not use CLOROX, Windex or any other household
cleaners. These chemicals will make the fabric sticky over
time. Sun screen lotions may contain silicon that will also make
PVC fabric sticky. Clean the boat tubes of any sun screen
lotion marks to extend the boat fabric life cycle.
Please use ONLY cleaning solutions that are approved for
PVC fabrics. Do not use CLOROX, Windex or any other household
cleaners. These chemicals will make the fabric sticky over
time. Sun screen lotions may contain silicon that will also make
PVC fabric sticky. Clean the boat tubes of any sun screen
lotion marks to extend the boat fabric life cycle.
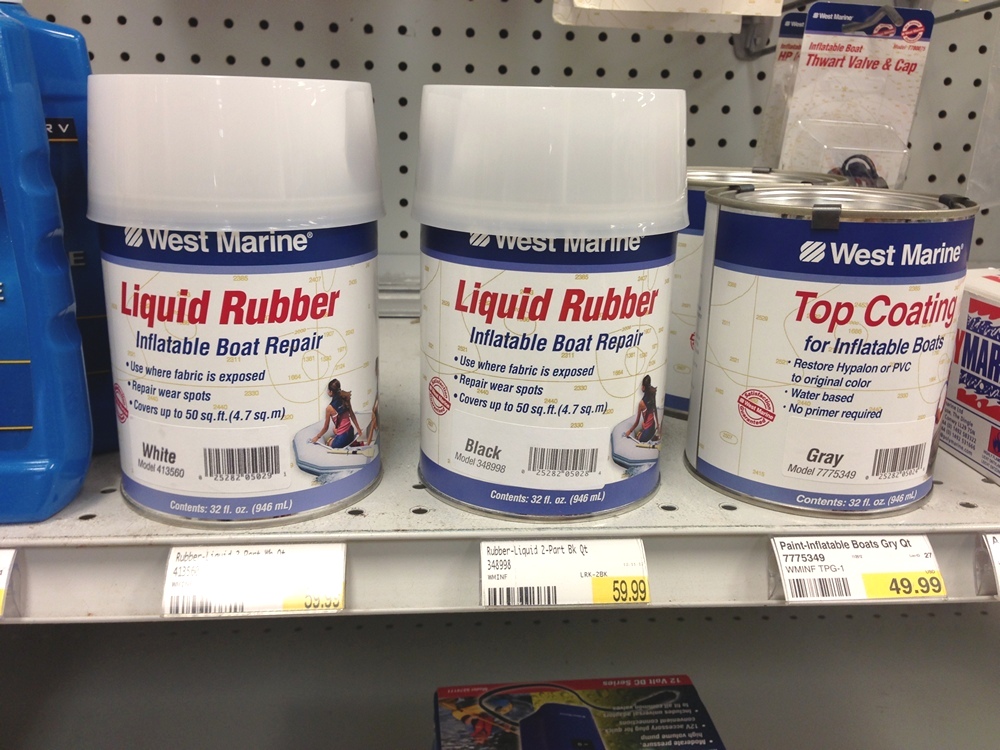
Your local West Marine store always carry number of inflatable boats cleaners, protectants and boat paints that will help to keep your inflatable boat as good as new.
We
also recommend very convenient
Swipes
Wipes
, as they contain an excellent cleaning solution for
inflatable boats. These wipes remove any type of dirt, protect
against UV-rays and can make the boat look new again.
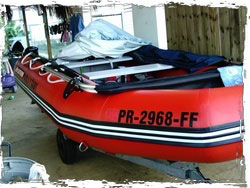
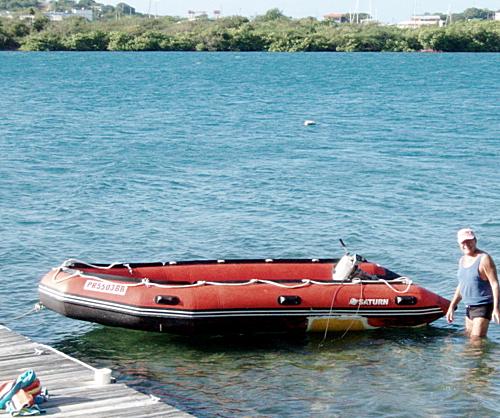
| Here is two identical 4-years old Saturn boats purchased at the same time and owned by two different customers in Puerto Rico. One boat was never covered, another was cleaned and covered with a boat cover. | |
|
|
|
Guess which one of above boats was covered and which one was left under the sun? A reminder to all of our friends and customers in the hot and humid areas of South Florida, Texas, LA and the likes. Please keep in mind when storing any inflatable raft or flotation device that your garage can easily reach temperatures of 100+ degrees in the heat of summer, not to mention swelter in unprecedented levels of humidity for months on end. This unnecessary and easily avoidable exposure to constant moisture is known to corrode away at the integrity of the chemical bond used to weld your inflatable together. It is recommended by us here at Saturn that you always
cover your inflatable when not in use, and when possible deflate so that
you can store away within a climate controlled area of your house. Also
note that if you are unable to pack away your inflatable to always
reduce the amount of pressure within the tubes and floor as heat
exposure will cause the air contained within the vessel to expand,
ultimately resulting in a burst seem. The few extra minutes spent
packing away your
If you will take proper care of your inflatable boat, it may last well over its warranty timeframe; over 10 years! See example of this Craigslist ad posted in March of 2015 advertising 2003 Saturn inflatable boat in a great condition. |
|
![]() What documents are needed to
register my inflatable boat?
What documents are needed to
register my inflatable boat?
![]() You will need a Manufacturer Certificate of Origin (MCO) and Bill Of
Sale (BOS) to register vessel in US, along with invoice to show amount paid. Usually MCO and Bill of Sale provided inside shipping box. But, if any of
these documents are missing or damaged, please visit the
Downloads
page for replacements and example how to fill out MCO and BOS.
You will need a Manufacturer Certificate of Origin (MCO) and Bill Of
Sale (BOS) to register vessel in US, along with invoice to show amount paid. Usually MCO and Bill of Sale provided inside shipping box. But, if any of
these documents are missing or damaged, please visit the
Downloads
page for replacements and example how to fill out MCO and BOS.
You must hand write yourself all necessary information using pen: purchase price, your name, address and date of purchase. Please see sample how to fill out at Downloads page. Please email if you have questions. Enter boat length, width, and year, which is last 2 digits on Hull Identification Number (HIN). Don't forget to enter the correct HIN number that can be found on a transom of your boat, or side of shipping box. HIN number starts from letters VEJ and then numbers.
Important - DO NOT bring blank forms to the Tag agency. They will send you back. You MUST fill out MCO and BOS before going to registration office. If for some reasons you are unable to hand write your own name and address, we will gladly do that for you. If asked for Federal Tax ID, please use these number: 20-4161513.
DO NOT fill out section with Notarization on it. That is section to be filled out ONLY if you sell your boat to a private buyer, in case if vessel was never registered by original buyer. Leave that section blank. Notarization is NOT reguired to register boat purchased form us - manufacturer. The First Assignment section is for you to fill out when you are going to re-sell the boat to private seller without registration it first.
BoatsToGo, Inc represents manufacturers in the US, and a signed first page should be more then enough to register your boat. There are no manufacturers in the US who provide a notarized copy of the MSO. However some offices are just giving a hard time to customers. Sometime going to another register or Tag agency can resolve problem.
Once again, if paperwork was properly filled out with no errors, then notarization is not needed. However, if notarization is absolutely necessary for whatever reasons, we can provide a notarized copy of the MSO for a fee of $40. Please visit https://www.BoatsToGo.com/payment.asp to send $40 payment if you need notarization.
If you are having difficulties to register your vessel with Tag Agency in Florida, easiest fix is to go to different tag agency. In Florida all Tag Agency are private companies, and sometime they make up their own rules, which has nothing to do what is actually required. Easiest fix is either to go to different window or different Tag Agency. Tested 100%.
If you registration was rejected because office asking for manual hand signatures or bad print work, which happens sometime, let us know, and we will mail you new registration documents with hand signatures by pen.
What to do if a hand pump arrives damaged?
Saturn inflatable boats and rafts are of excellent quality
and workmanship. However, in efforts to pass the savings
on to
you, we are keeping costs as low as possible. Instead of
enclosing a high quality and expensive hand pump, and then
passing the cost to you, we are enclosing good quality generic
hand pumps. The hand pump enclosed with the boat is free and is a
complimentary gift to you.
In rare occasions, if FedEx drops the shipping box during handling, the hose of the pump may get squeezed by the weight of the boat and develop small cracks. The simplest and fastest solution for cracks in a hose would be to apply duct tape around the hose. This will make the hand pump fully operational again. However, if you wish to receive a new pump, please send damaged pump back for replacement. Click here for return address.
If the hose is fine and the pump doesn't provide enough pressure to inflate the boat, then unscrew the green cup with a T-handle and inspect the rubber seal on the plunger. If it's torn, let us know and we will send you a replacement seal.
Please note that high-performance manual and high-pressure electric pumps are available from our Accessory section.
What to do if hand pump does not work?
The Saturn boats, rafts and kayak should be inflated until quite firm. If you find the hand pump provided is not able to achieve enough pressure, inspect the hose and all connections for leaks. Remove the hose and block the air outlet at the T handle with the palm or your hand while pushing down on the T handle. You should encounter very substantial resistance to pushing down when the air outlet is blocked. If instead the handle goes down easily, open up the pump by unscrewing the green
cylinder lid and inspect the black rubber seal to see if it is torn or improperly installed.
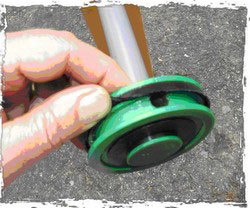 On the end of the plunger you will see 3 ridges: A top ridge, a 2nd ridge that is just below the top one, and a bottom ridge. When the black rubber seal is properly installed it is in the valley between the top ridge and the 2nd ridge, and it covers the 2nd ridge. Photo shows proper location and orientation of the black rubber seal.
The seal is bell-shaped so that its upper opening is smaller in diameter than its lower one. If it is upside down, remove it and turn it over. If it is in the wrong location (i.e., if it is below the 2nd ridge instead of above it), move it to the correct place as shown in the photo.
Once the rubber seal is properly situated, re-assemble the pump, taking care not to damage the seal. Use your fingers, and the fingers of a helper if necessary, to stuff the edges of the seal into the cylinder so that it does not get displaced or damaged as you insert it.
Make sure you apply enough grease.
Can I use inflatable boat,
kayak or KaBoat for fishing or spear fishing?
Any of our Inflatables can be used for fishing, diving,
snorkeling, spear fishing or any other fun sport activity on
the water, as long as it's safe. However, please exercise
caution while handling fish around Inflatables. Pectoral
fins of most fish are extremely sharp and can easily puncture
any PVC or Hypalon fabric. If you just throw fish inside your
inflatable boat, there is a risk that the fish may jump and
accidentally puncture your boat. Pectoral fins of many fish
are so small and sharp that they may create micro punctures
that will not be noticed immediately. Most likely, punctures
by fish fins will cause slow leaks that may take several days
to notice. It is easy to fix micro holes by simply applying a
drop of glue. However, to avoid the possibility of such
accidental punctures by fish, we recommend dropping fish
inside a basket or cooler, or to keep a collapsible fish
basket attached outside of the boat with a rope. It is
advisable to avoid direct contact between the live fish and
the air filled chambers.
What accessories come standard with Saturn inflatable
boats?
All boats come with 1 seat bench. All
boats come with a hand pump, repair kit, carry bag, aluminum
oars, 4' rope and either an air or plywood floor. Depending on a model, 2nd bench can be provided when order is placed on-line.
Optional accessories: boat cover , under seat storage bag with cushion , extra plywood seat , valve adaptor for electric pump , do-it-yourself plans for building sun-shade canopy , etc. We are constantly adding new accessories. Please visit our Accessories-Parts page for all optional accessories and spare parts.
How to fold inflatable boat for compact storage?
Click here for step-by-step
instructions for deflating and folding your boat.
Do I need to install a hydrofoil on the outboard
motor for inflatable dingy?
We recommend that you install a hydrofoil on the outboard motor in
order to improve speed and boat handling. A Hydrofoil will help
put the boat on plane much faster and will help maintain the
planning
effect at lower speeds. See picture below, on the left without a hydrofoil, on
the right with
a hydrofoil installed. You can find hydrofoil in West Marine,
on-line or Wal-Mart boating section starting at $25.

How to protect air floors from accidental punctures or sharp
dog claws?
An air floor PVC material has been designed to be strong and
puncture-resistant. But if enough pressure is applied with a
sharp object, like a knife or fishing hook for example, then a
puncture may sometime occur. Dog claws, in general, are not
sharp enough to puncture an air floor. But small pieces of sharp
broken glass or similar objects may stick to the insole of shoes while
boarding the dinghy and may also cut the surface of air floors in some
cases.
To avoid damage to the high-pressure air floor, and keep it as good as new, you can purchase a piece of vinyl floor covering in a hardware store, or just use regular carpeting. Cut the vinyl or carpet to fit the inside of the boat and over the floor. Use paper patterns first, to get a perfect fit. Then use this paper pattern to cut the new flooring.
Applying vinyl or carpet covering will make inflatable air floors virtually indestructible. Floor vinyl covering or carpet is flexible and may be rolled up for storage when boat is deflated.
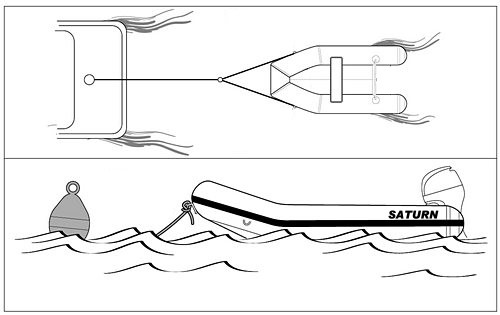
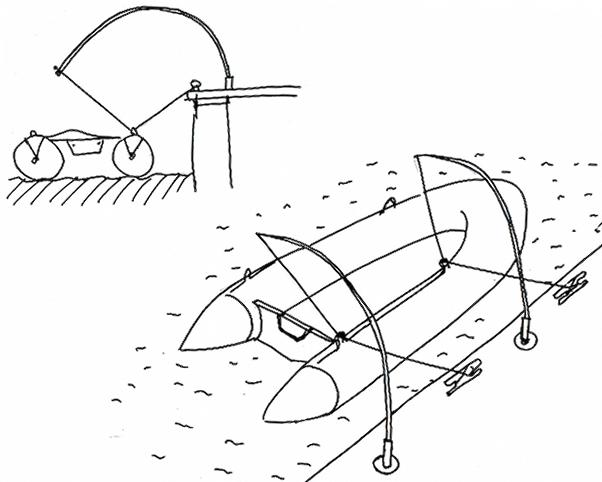
How to properly tow inflatable dinghy behind a sailboat or yacht?
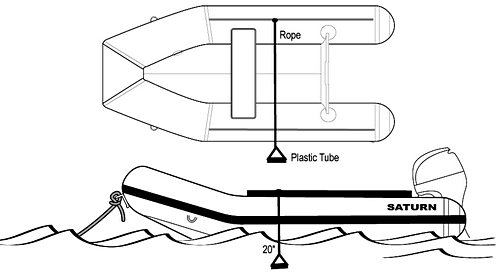
Towing bridle is necessary in order to properly tow your inflatable boat. Towing bridles are available at many marine retail stores and on-line. Do not tow
the inflatable boat by connecting rope to the central D-ring with integrated handle. Use towing D-rings on both sides of
the dinghy bow.
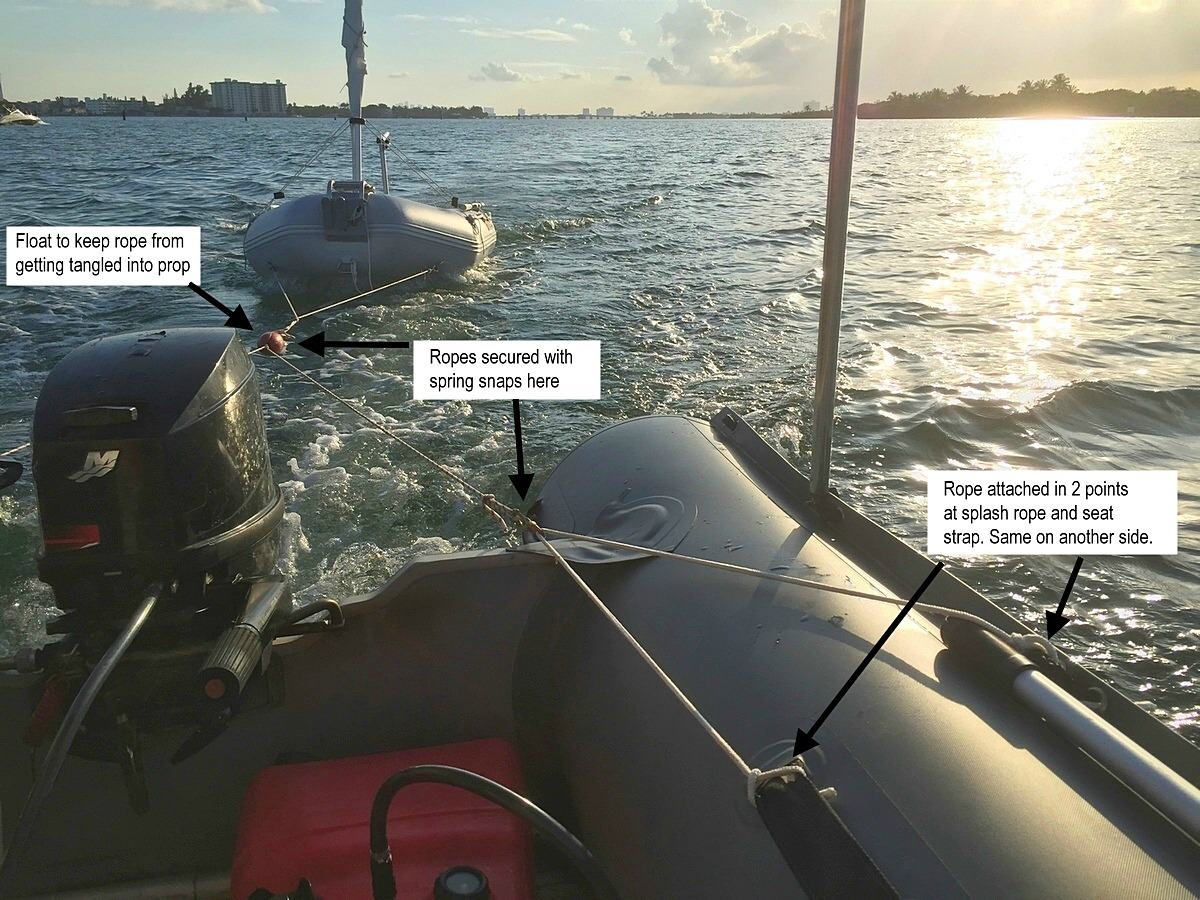 The most common mistake made when towing is the improper use of the towing bridle. Many boaters knot the tow bridle into a loop at the center, and attach a towing line there. This is wrong. The towing line should not be fixed to the bridle, but instead should end in a small bowline loop, through which the bridle passes. This allows the towline to slew back and forth in the bridle, and provides for tension
on both sides of the bridle. Not rigging the towline this way is the most common cause of failure of the pad eyes on the dingy to which the tow bridle is attached. It is inevitable that during towing, the dingy will rock a little from side to side, shifting the strain on the bridle from one side to the other. If the towline is rigidly fixed to the center of the bridle, one pad eye will be momentarily required to sustain the entire tow load. If the towline can shift its position in the bridle, both sides of the bridle will remain in tension, and the load will be distributed to both pad eyes on the dingy.
The most common mistake made when towing is the improper use of the towing bridle. Many boaters knot the tow bridle into a loop at the center, and attach a towing line there. This is wrong. The towing line should not be fixed to the bridle, but instead should end in a small bowline loop, through which the bridle passes. This allows the towline to slew back and forth in the bridle, and provides for tension
on both sides of the bridle. Not rigging the towline this way is the most common cause of failure of the pad eyes on the dingy to which the tow bridle is attached. It is inevitable that during towing, the dingy will rock a little from side to side, shifting the strain on the bridle from one side to the other. If the towline is rigidly fixed to the center of the bridle, one pad eye will be momentarily required to sustain the entire tow load. If the towline can shift its position in the bridle, both sides of the bridle will remain in tension, and the load will be distributed to both pad eyes on the dingy.
Many cruising sailors have small outboard motors for use with their inflatables, which creates a dilemma when it's time to tow: should the motor be left on the dingy while towing? The tendency to do this is proportional to the weight of the outboard and the difficulty in removing it and storing it on the boat. There are a number of reasons for recommending against towing with the outboard on the dingy.
First, there is the hazard to the outboard. In large seas the dingy might flip over, submerging the motor. It's also possible that violent motion in
the seaway could cause the motor to fall off the dingy transom. These things always seem to happen when you'd least
expect them to, usually when a ten-foot sea is running!
Another consideration is the additional tow load the extra weight of the motor will create. A completely empty inflatable is usually a very light craft and hence a very light tow load. When you add 70 pounds or more of motor and gas tank, you could very well be doubling the tow load from a small inflatable.
The problem most likely to occur in towing the dingy is shipping water aboard. It can quickly lead to failure of the bridle pad eyes, especially in those instances where the load is not being equalized. Even just six inches of water in an inflatable can weight
hundreds of pounds.
How can I prevent the outboard motor from damaging the transom while
transporting my boat on a trailer?
While transporting inflatable boats on a trailer with the outboard motor in a raised position, heavy outboard engines may
provide extra strain on a boat's transom. When a moving trailer hits a
bump or uneven pavement, heavy motors are capable of damaging
the transom. You can install a pole support from the end of
the trailer to the end of the outboard motor in order to
provide extra support for the motor's weight. These supports are
available at places that sell trailers for boats and/or
on-line.
Can I pump up my inflatable boat using electric pump only?
You will need to use a hand pump to provide proper air
pressure to the tubes if you are using low pressure electric
pump. Inexpensive electric pumps sold for $20-$50 in retail
stores will not provide enough
air pressure, and your boat will not operate to it's full
performance. You may quickly inflate all air compartments with
low pressure inexpensive electric pump, up to the point where no more air can be
electrically pumped inside, or about 80-90%. Then, you will need to use a hand pump until
the tubes,
keel and bow are hard to the touch.
To completely inflate boat or kayak or raft or any other inflatables to the recommended air pressure without use of hand pump, you will need a special High-Pressure Electric pump sold in our Accessories section.
![]() How Saturn inflatable boats are different from other brands?
How Saturn inflatable boats are different from other brands?
Saturn
Inflatable boats are made of the same quality materials as famous expensive
brand name inflatable boats. The workmanship is exactly the same or even better quality
then most overpriced brand names that you can buy in retail
marine stores. SATURN Our SATURN boats are made by a
major manufacturer
of inflatable boats in Korea.
Some of Saturn boats strong points:
- Very clean, hand-made seams. Glue does not stick out from seams.
- Double layer fabric at the bottom of all tubes .
- The Extra thick 1100 Dtex fabric with polyester support is a much thicker fabric than some other famous brands use.
- Flat and rigid air floor. Not bended in front like on most other brands.
- Safety valve that prevents over-inflation.
There are several reasons why our prices are the lowest in the US:
- We import directly from the manufacturer
bypassing the middleman.
- By conducting our business on-line we
avoid expenses that retail stores are passing on to their
customers.
- We do not invest as heavily in marketing
as other famous brands do.
- We don't have to maintain a large network
of dealers and retail stores.
- Our 2 year warranty doesn't force you
to pay for extra years that otherwise are just built-in
into the retail price.
Many of our customers are boaters that have experience with other brand names such as Zodiac, Avon, West Marine, etc. However, after purchasing Saturn boats, we hear many comments stating that our boats are the same or better quality as these other major brands. The most common remark is, " Saturn boats are much better quality then expected" and 50% of our sales come from the referrals of happy owners of Saturn inflatable boats.
What type of outboard motor can be installed on a Saturn
inflatable boat?
Short
shaft 15" outboard motors are recommended to be installed on
the 15" transom of Saturn
inflatable boats.
The lighter the outboard motor - the better. Either 2-stroke or
4-stroke engines may be installed on a boat transom, however 2-stroke engines are generally much lighter then 4-stroke
outboard motors.
Long shaft 20" motors are not recommended, but may also be installed if a short shaft o/b is unavailable. However a long shaft o/b may create extra underwater drag. Long shaft o/b may be raised a few inches with the help of a 2-3" wooden bar placed on top of the boat's transom.
Max O/B motor, as per technical specifications for Saturn inflatable boats , means that this particular HP power output motor will bring the boat on plane when the maximum persons capacity is reached. For example, the SD365 can take up to a 30 HP outboard motor, but a 9HP or 15 HP motor will move this boat very nicely with 2-3 people on board. However, to put the boat on plane with a full load of 5 people and gear, a 30 HP motor may be required.
Are Saturn inflatable boats certified or approved?
Manufacturer Identification Codes (MIC)
were assigned by the US
Coast Guard on May 6, 2003. Our boats have been CE, ISO and Germanischer Lloyd
Certified in Europe, Asia and Australia. The NMMA certification is
expensive and optional, therefore we did not applied for such a certification
in order to keep our expenses/prices as low as possible.
How to properly operate inflatable boat air valve.
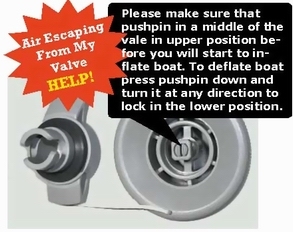
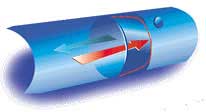
The valve has a special pushpin inside. This pushpin has two positions, both up and down. When it is pressed in the down position, air will escape. If you turn the pushpin in any direction it will pop up. This will lock air inside and prevent it from escaping through the valve. Before inserting the air pump tube into the valve, please make sure that the pushpin is in the upper, popped up position. Once the pin is in the "popped up" position, insert the air pump tube into the valve and inflate the boat until it becomes hard. Once you remove the air pump, air will seal the valve and will no longer escape. If you would like to deflate the boat later on, press down on the pushpin and turn it in any direction until it stays in the pressed down position. Air will immediately escape from the tubes thru the valve.
![]() How do I replace the air valve in my
inflatable boat, kayak or raft?
How do I replace the air valve in my
inflatable boat, kayak or raft?
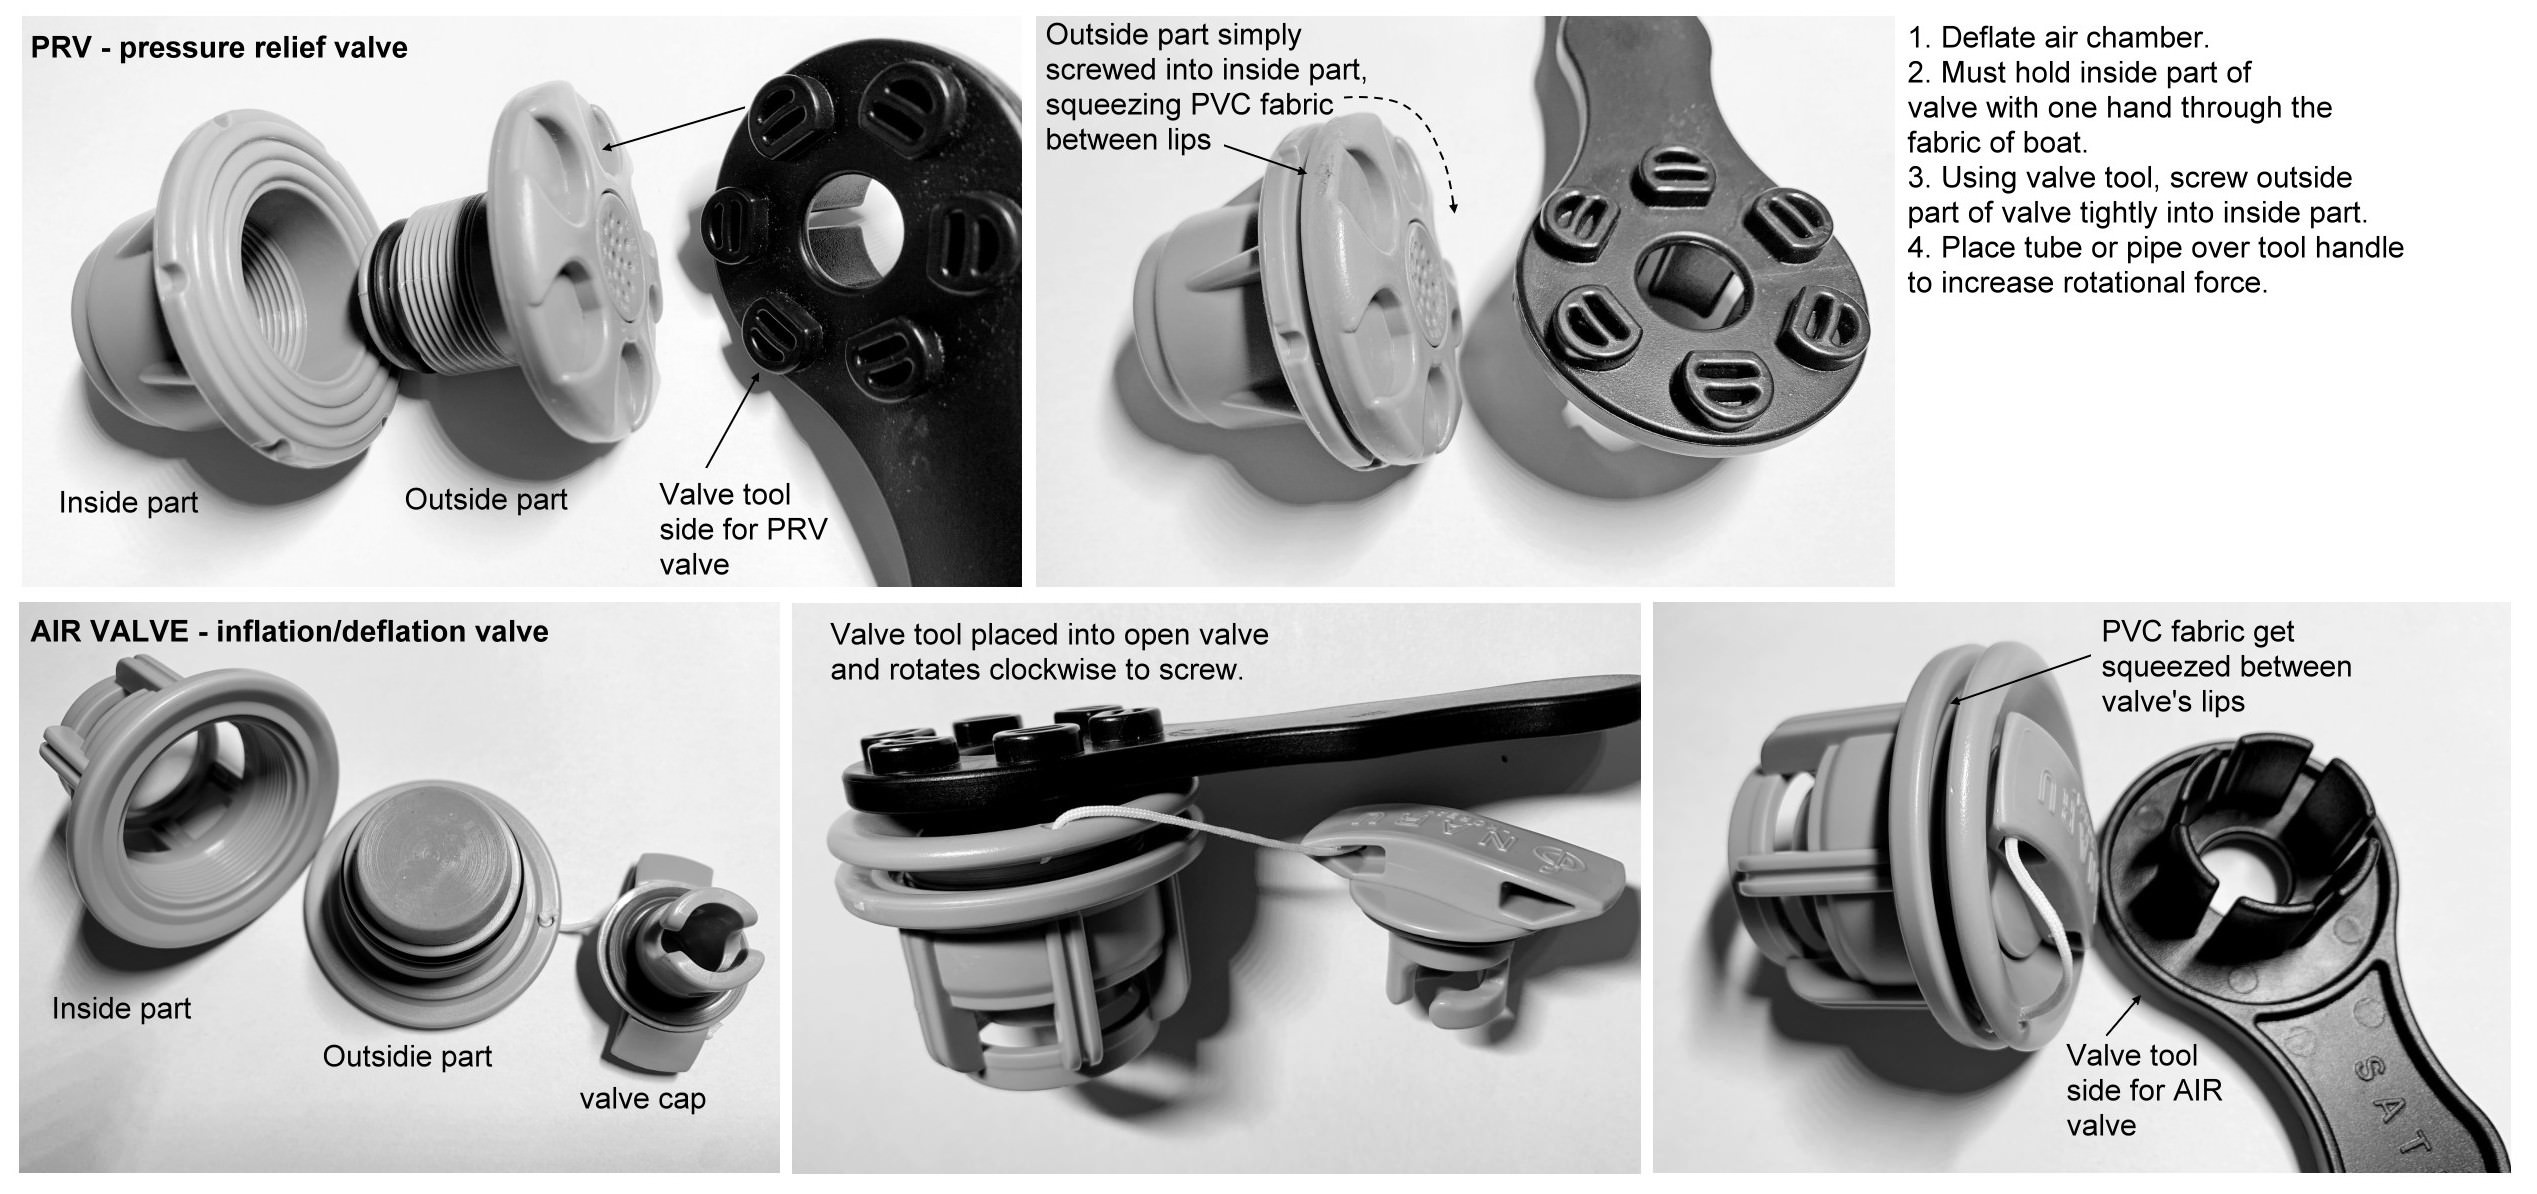
Please go to the valve assembly page
to see how a damaged or defective valve can be replaced.
Replacement valves and tools for their replacement can be
ordered at
https://www.BoatsToGo.com/valves.asp.
Top part of the valve can be simply unscrewed for cleaning or replacement. New
valve can be screwed in place of old one. In most cases, simply cleaning rubber
seal inside the valve will fix slow leak that may develop over time due to the
grime and residue collection on top of that seal.
![]() What outboard motor do I
need to put inflatable boat on plane?
What outboard motor do I
need to put inflatable boat on plane?
Under normal circumstances,
with half of a maximum persons/load capacity, or about 50% of
the maximum
O/B power rating may be necessary to put the boat on plane. For
example: the SD365 is rated for up to a 30 HP outboard motor. But
a 15 HP
with hydrofoil installed would be enough to put a 12' boat on
plane with 1-4 people and a light load.
The lighter the motor, the faster boat will run. 2-stroke engines, while still possible to find, are much lighter then 4-strokes, and will provide same power at less strain to the transom.
Max O/B Motor means: the maximum power outboard motor that can be safely used to plane a boat loaded to the maximum capacity on normal water surface conditions. Please exercise common sense and caution when using maximum motor capacities. Do not jump from wave to wave as new 4-stroke motors are much heavier then 2-strokes and provide extra strain on the transom.
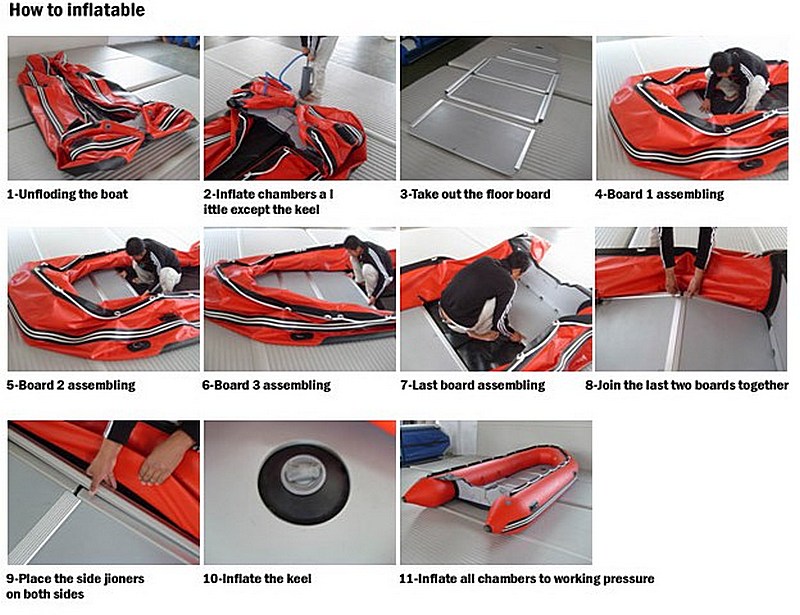
What are the steps to correctly assemble inflatable
boat with hard floor?
These are the steps you should
follow to correctly inflate the boat:
Steps for assembly inflatable boat with an air floor:
- Inflate all tubes to approximately 75% full.
- Insert boat seats in designated spots.
- Place deflated air floor inside the boat. The gray plywood board should be facing the keel. Make sure that the valve of the keel is accessible through the hole in the air floor. You will need it later to inflate the keel through this hole.
- Place both ends of plywood boards under the left and right sides of tubes.
- Stretch the air floor along the boats bottom, so it covers it from nose to transom. The rear end of the air floor should be touching the transom.
- Inflate the air floor until it's hard. You will know that the floor is fully inflated when the air pressure starts pushing the air pump handle up.
- Inflate all tubes 100% until hard to touch.
- Inflate the keel through the hole in air floor.
- Please see this FAQ about importance of proper inflation of boat tubes and keel.
Steps for assembly inflatable boat with plywood floor. Click image to zoom in:
What is the working air pressure, and do I need
a pressure gauge?
It is not necessary to have an air pressure gauge to inflate Saturn boats. The boat tubes are equipped with Safety valves that will prevent over-inflation. In general, when you feel that boat tubes/floor are hard to the touch, and it becomes difficult to pump any more air in, that means that the boat is ready. However, if you are using a high-pressure electric
air pump, please use below guidelines to avoid boat
over-inflation and consequential damage.
Helpful conversion factors:
- 1 psi = 0.06895 bar
- 1 bar = 14.50326 psi
- 1 kpa = 0.145 psi
 How
do I tie up my inflatable dinghy boat to the dock?
How
do I tie up my inflatable dinghy boat to the dock?
If you are planning to keep your inflated dinghy in water or by the dock for extended periods of time, here is a simple scheme that you may follow. Gray PVC 1/2" electric pipes can be used as pole supports. PVC pipes are available in local hardware stores and Home Depot. They provide enough tension to keep the dingy from rubbing against the dock. However keep in mind that prolonged exposure to open water will cause extensive algae and barnacle growth on the bottom part of the boat.
How to make inflatable boat seat bench to be softer on a bumpy rides?
Here is a web page with a FREE instructions for how to make Deluxe Soft Cushion that will go over your boat plywood or aluminum bench. This is complimentary instructions for DIY project provided as-is as a gift to our customers. We will not be able to provide any other information besides already provided on that page.
How to make swim ladder to get into
inflatable boat from the water?
You will need 8-9 inch long pieces of 2" diameter white plumbing PVC pipe and a piece of thick rope. Drill holes at the end of each pipe and run the rope from one hole to another.
Make 2 knots where the rope exits the holes in the pipe, to make sure that the pipe will stay in place and will not slide when boarding the boat.
Make knots along the rope to assist with pulling yourself out of the water. Attach rope to the grab line, or any other place that can support heavy weight and throw the other end of the rope across the boat into the water, so that it is 20" below water line.
When boarding, insert one foot inside the loop with the pipe and grab the rope with both hands. Pull your body inside the boat, by using knots on the rope to help you up.
|
|
|
How to properly load inflatable boat?
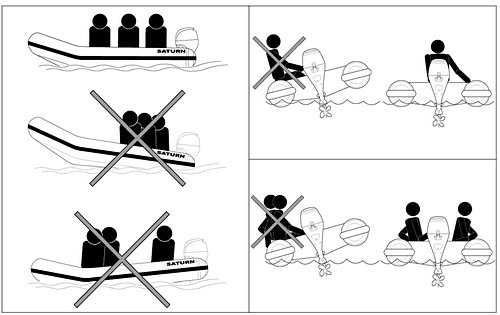
Please see below for proper loading of the inflatable boat:
Where do I get a Bill of Sale and
Manufacturer Certificate Of Origin in order to
register my boat?
If the Bill Of Sale is missing from the shipping pouch or you need replacement documents, you can download the necessary paperwork by clicking on the Downloads link.
![]() The keel tube under the floor is skewed to one side. How to
fix it?
The keel tube under the floor is skewed to one side. How to
fix it?
![]() Please follow these steps to correct positioning of the keel.
Please follow these steps to correct positioning of the keel.
1. Deflate boat tubes.
2. Deflate and remove air floor.
3. Inflate keel and then deflate it while spreading it out evenly on both sides.
4. Insert air floor back and inflate boat tubes 100%.
5. Inflate air floor, then inflate keel.
![]() How to fix cavitation in inflatable boat or dinghy?
How to fix cavitation in inflatable boat or dinghy?
![]() There are 3 major reasons for cavitation problems. First, is an incorrect or damaged prop. The second, and most likely, is that the boat is not fully or properly inflated. If the boat's chambers are not fully inflated, this will cause water disturbance under the boat tubes, and cavitations as a result. Please make sure that the boat is fully inflated by using hand pump. Do not use only electric pumps or compressors to inflate the boat. Use a hand air pump to pump up all boat chambers until they are hard to the touch. In general, once you feel that it becomes difficult to pump any more air with a hand pump, it means that the chamber is full. You can lightly knock with your hand on each compartment and it should feel hard, not soft. 3rd, and often overlooked reason for cavitation is seaweed
and/or debris in a water stuck to outboard skegs or prop. Even a little bit of
seaweed or piece of plastic bag stuck in small outboard can cause it to
cavitate. Easiest fix for that is to put motor in a neutral, and clean debris
around prop. Make sure prop is not rotating.
There are 3 major reasons for cavitation problems. First, is an incorrect or damaged prop. The second, and most likely, is that the boat is not fully or properly inflated. If the boat's chambers are not fully inflated, this will cause water disturbance under the boat tubes, and cavitations as a result. Please make sure that the boat is fully inflated by using hand pump. Do not use only electric pumps or compressors to inflate the boat. Use a hand air pump to pump up all boat chambers until they are hard to the touch. In general, once you feel that it becomes difficult to pump any more air with a hand pump, it means that the chamber is full. You can lightly knock with your hand on each compartment and it should feel hard, not soft. 3rd, and often overlooked reason for cavitation is seaweed
and/or debris in a water stuck to outboard skegs or prop. Even a little bit of
seaweed or piece of plastic bag stuck in small outboard can cause it to
cavitate. Easiest fix for that is to put motor in a neutral, and clean debris
around prop. Make sure prop is not rotating.
The most recent response from a customer who fixed cavitation by properly inflating his SD365 boat was: " Thanks, I did what you said and went out in the ocean today and my boat ran great, really moves with this Honda 20hp outboard."
Customer's video about prop difference
More Info about Cavitation due to the outboard propeller:
Ventilation occurs when surface air or exhaust gases are drawn into the propeller blades. The load on the propeller is reduced by the mixing of air or exhaust into the water steam causing over revving.
Anti-ventilation Plate: A large plate cast into gear case housing directly above propeller. Helps reduce surface air from being pulled into the blades.
Cavitation: The aeration (bubbling) and boiling effect of water caused by creation of a low pressure area. Generally caused by a solid shape (propeller blade) passing through the water, in such a position and speed, that a low pressure area is formed due to the inability to move through the water in nonresistant manner. An example is, a propeller blade that has a rough edge would not cut efficiently through the water, thus creating a low pressure area. If the pressure drops below the vapor pressure, a cavitation bubble will form in that region. These bubbles will collapse when they reach the higher pressure region of the blade. This causes a rapid change in pressure and can result in physical erosion. You may notice burns (erosion) at some area on the face of the blade.
Here is email from customer who complained about cavitation issue that was resolved after he had changed prop to different pitch:
"Oh happy day!!!! Took the boat out with the new
propeller 8 pitch and the boat cruised along like a champ, you may want to let
people know it they are at high altitude lakes the pitch of your propeller
should be at the lowest level available for your motor type. I'm so happy my
boat works, can't wait to go again!! Thanks for all your help with my
issue."
How
can you avoid slipping in the boat seat while the boat is in
motion?
You can apply a non-slip stair tread tape which is manufactured by 3M. It is very durable and is water resistant as well. It is available in most hardware stores. It is made to be used on stairs but also works well on boat seats to keep you from slipping into turns when a boat is in motion. It makes the seats non-slip!
What
to do if water slowly leaking into inflatable boat?
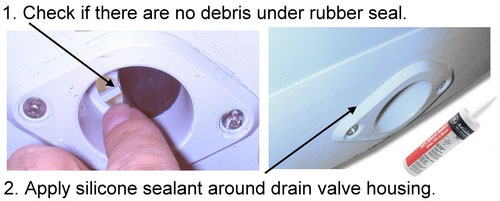
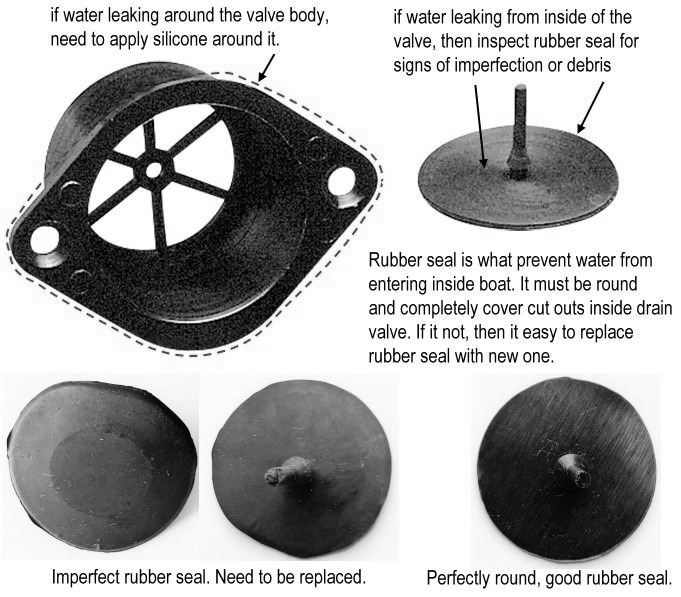
Most likely place where water can enter inflatable boat is a one-way drain valve. There are several reasons why water may sip into the boat, and fixes are usually quick and easy.
- Drain plug is not fully inserted. Please make sure there are no debris on a plug, and press on drain plug to make sure it is all way in.
- One-way rubber seal that lock the valve is dirty, or there are debris under the seal. Pull rubber seal with your finger and inspect for debris stack between seal and plastic housing. Wipe rubber seal with an acetone.
- Black one way rubber seal that lock valve is imperfect or not fully closing opening. Rubber seal is what preventing water from entering boat through the drain valve. If it not perfectly round, or have some defects, it need to be replaced. If boat under warranty, we will provide this part. Replacement drain valves can also be purchased on Amazon or Ebay. Please search for "inflatable boat drain" to purchase replacement.
- Drain plug assembly got loose or not enough sealant under the drain valve outer body. Tighten screws on a drain plug while avoiding cracking plastic part. Apply door/window clear silicone sealant around drain valve assembly. Replacement drain plug assemblies are also available per request.
Once boat in a water, it will always have some water in it. Due to rains or back splash from outboard, etc. It is almost impossible to have boat seating in water to be 100% dry. To remove water from boat, there are several inexpensive options available on Amazon or Ebay, such as manual bilge pump, battery operated bilge pump, absorbent fabrics, etc.
How to minimize pressure
on seat bench
by heavy person?
Put a regular cooler between the seat and air or plywood floor to create extra support for the plywood seat. The cooler has to fit under the seat. There are IGLOO or Coleman coolers available in department stores that are just the right size. Coolers can
also serve as dry storage containers. When a boat is jumping on
waves, coolers will prevent excessive pressure on the strips that
hold the plywood seat attached to the tubes. For example, a Coleman
9 Qt. Excursion, Red cooler, dimensions 11.25" x
12.66" x 9.75", Vendor Part Number: 6209A703G,
around $15.
Can inflatable boat be fixed if it get a really big cut?
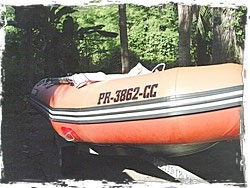
One of our customers cut 4' opening in a boat tubes when he run over sharp rock. Here is a quote from customer's email:
"Below is not a very good photo, but it may serve to remind you of the 4 foot gash I had on the port chamber of my 14-foot Saturn. Since this was taken, I have put on the big motor and been bopping all around the huge bay of Culebra, PR. She runs like new!!! I can hardly believe it.
 Most boat people here never thought the gash could be fixed. What you see here is only the top part. As you get further under the chamber, the tear continues for another 2 feet toward the stern. I had a local guy here stitch first from the inside, then from the outside. He began layering the patches, using 5200 Sealant. It still leaked after that, but only thru small pinholes. It was then I I found at Inland Marine an expensive liquid adhesive that gets applied from INSIDE the chamber. Then the boat gets rocked back and forth to spread the glue evenly. I gave it 2 "coatings" on 2 separate days. Then I went all around the perimeter (edges) of the patch again with a fresh application of 5200. And voila, it sealed perfectly, not the slightest leak.
For 5 days now I've been using the boat, and there's no sign of leakage, nor of the patch peeling back. Am I a lucky son of a gun, or what!!! The Saturn has proven to be so resilient. It just wants to please me. I'm very grateful for your extra PVC fabric AND SUPPORT! One day I will visit you in FL to shake your hands. Meantime, the Saturn name has gotten a lot of positive attention here on Culebra! Very best wishes." Mark
How to set up
trailer for inflatable boat?
Regular Jet Ski trailer will work just fine for almost any
inflatable boat. You can find used Jet Ski trailers at Craigslist.com, or look
up in local classifieds.
Harbor
Freight Tools
offers very inexpensive foldable utility trailers that
can be converted into boat trailer. Please see bellow excellent
video of trailer setup submitted by one of our customers. Click on Play
button to start.
How to quickly make valve replacement tool
out of PVC pipe?
These DIY instructions are submitted by our customer:

The material used is inexpensive "1" size PVC plumbing tube. It is available at any home center or hardware. Mine was a scrap from another project. The work done is simple filing, or hand cutting, 6 little grooves into the end. That particular PVC pipe fits very closely into the NARU valve circular opening, after a little sanding is done. After proper filing of the 6 little grooves, and the sanding to fit the circular opening, it will fit over the 6 NARU valve structural parts, and allow a safe removal of the internal valve component by turning it counter-clockwise...Re-Assembly is obviously the reverse. This tool works exactly like a specialized SOCKET TOOL for mechanical work. I felt PLASTIC to be more compatible with the plastic valve, thus preventing potential breakage or cutting of the plastic valve components.
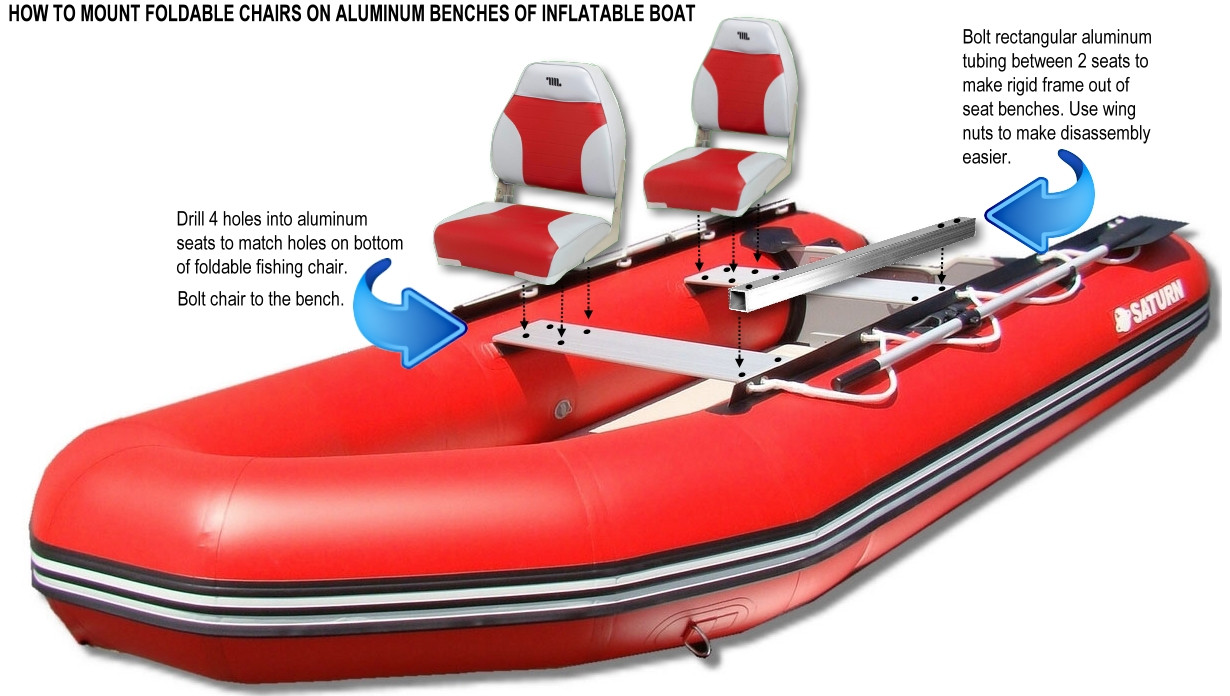
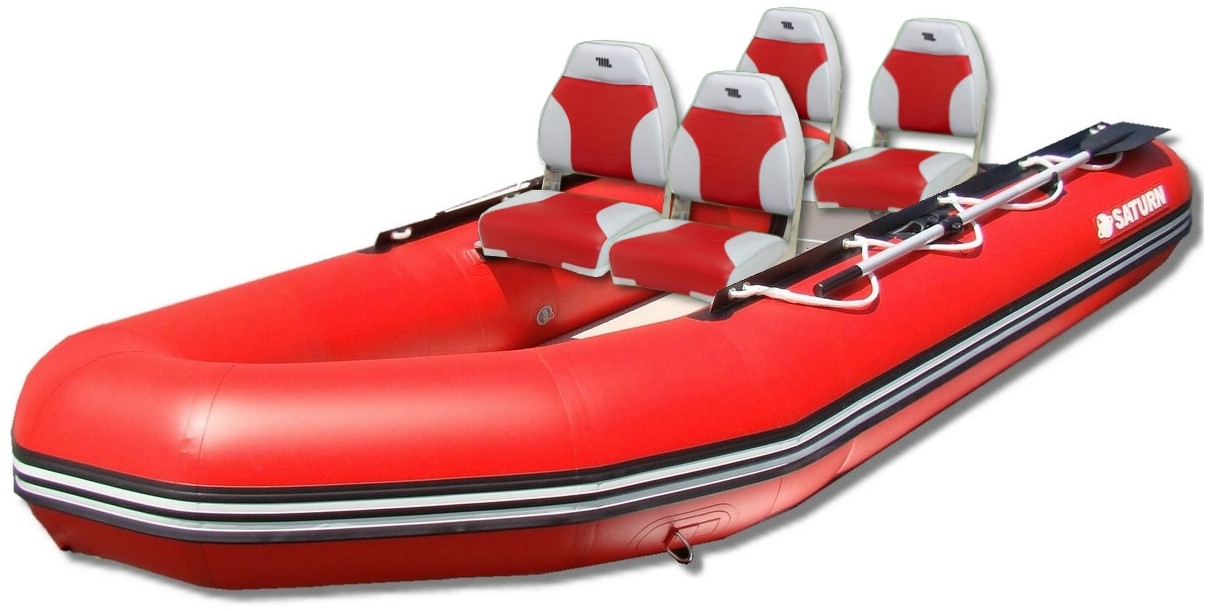
How to mount foldable chairs on seat benches?
Install rectangular aluminum tubing in between 2 seat benches. This will create rigid aluminum frame and will prevent benches to rolling backward when resting against back support of chair. Use wingnuts to make assembly/dissasembly quicker. Then drill holes in benches to match holes on bottom of foldable chairs. You can bolt chairs directly to benches, or install swivel platform with quick release mount to make chairs rotate and quickly disconnect from benches.
|
|
How to install registration numbers on a boat?
One of the easiest methods of attaching
registration numbers to side of inflatable dinghy; is to
affix registration sticker and numbers on rectangular
plastic board, such as cut from FOR SALE sign for example.
Drill or cut holes in corners of that board, and hang it
over the side of the inflatable boat, as near to the bow as
possible. Use plastic cable ties to attach board to safety
grab rope. USCG regulations state that the vessels
registration numbers must be visible at all time (not
permanently attached). Another option is to use stencil,
sold in Home Depot or Office Max, along with permanent black
marker to print registration number through stencil. Most
elegant option is to order registration numbers to be
printed by
www.BoatNumberPlate.com
Why my hard aluminum floor inside boat had developed cracks in side rails or bended?
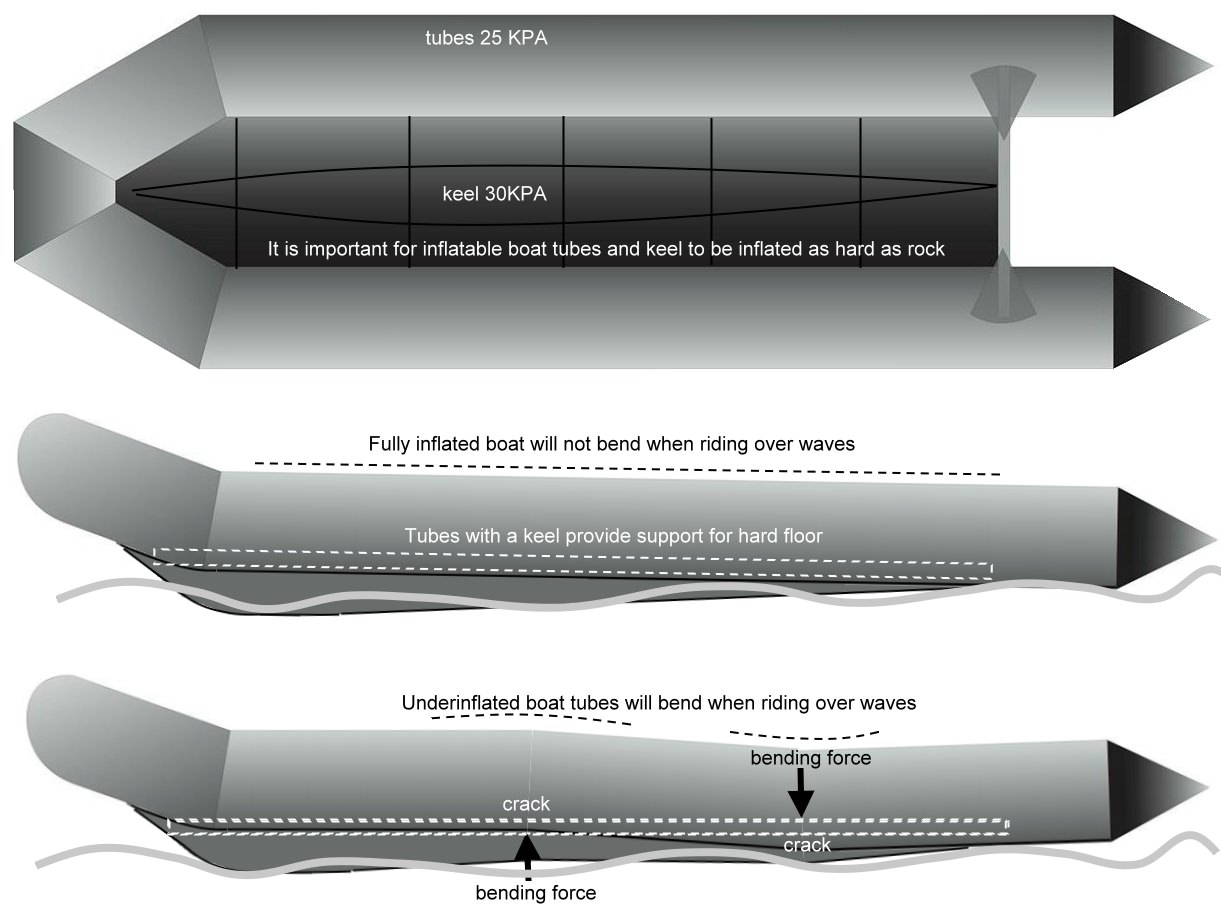
It is very important to have boat tubes and keel to be inflated
as hard as rock. Recommended air pressure for tubes is 25kpa, and keel is
30kpa. Inflatable boat tubes and keel
are designed to work together in order provide lateral support for hard floor
inside boat’s hull. Inflatable boat is not properly inflated if there is sagging
or wrinkling on a side of tubes, or when tubes or keel feels soft to the touch. Boat tubes and keel must be as hard as rock.
If keel is not fully inflated, or tubes are not hard enough, then all weight of heavy tubes are placed on floor boards, at the time when boat hull is gliding over waves, choppy water or when boat is accelerating.
Floor boards by itself are not designed to support heavy weight of the boat tubes and/or boat passengers, which might reach in hundreds of pounds of weight. Floor boards designed to work in conjunction with boat hull and keel.
Fully inflated keel designed to keep floor flat, so that to
minimize stress on side rails and floor board stringers. In addition, boat
tubes also squeezing floor boards via side stringers in order to keep floor
board in strait line. If keel is soft, there is nothing to provide support for
floor boards, and that can result in excessive stress on side rails which might
result in cracking or damages to floor boards. Please note that improper boat
inflation will void warranty on damaged floor boards.
Also, when boat tubes are underinflated, it is possible for stringers to move out of its position over side rails, those reducing support for floor boards, which would surely result in side rails cracks or bends to floor boards.
What is that stitching on a bottom of boat where floor attached to tubes?
At the time when boats are assembled back at the factory, bottom of each boat get stitched to strip of PVC that is then glued to inner sides of tubes. After that stitching is cut, and bottom of boat remains inside boat, between tubes. Absolutely all inflatable boats, kayaks and rafts has this type of stitching. That is the way inflatable products manufactured back at the factory, and this is not some kind of defect or issue. Cut stitching suppose to be there, and it covered by air floor one installed inside the boat.
How to store inflatable boat, load in a car and move around?
Please see below video from one of our customers for some tips and ides:
What does Pre Order Means? How Pre Orders work?
We accept pre orders for products available on incoming containers once we know approximate ETA (estimated time of arrival) on that container. That means that item not yet available, but it is inside container that was shipped out recently. ETA means Estimated Time of Arrival of container into US Port. Usually, it either Tacoma or Miami. Once container is in a port, it will take few days to unload from ship and deliver to warehouse. It will also take 1-3 days to unload container into warehouse box by box, and update into computer system. Once it done, then we can ship.
ETA date provided by shipping company and is estimated. That means that delays are possible in case of port congestion, or unloading delays, etc.
IMPORTANT: Please note that we have no control over shipments until container delivered, unloaded into warehouse and entered into computer system. However, once items become available, we trying to ship all pre orders ASAP, usually same or next day. It is in our best interested to ship out as soon as possible, in order to clear up warehouse space.
Pre Order means that we reserved product for you, and it will be guaranteed once container is received. Credit card on pre order will be charged day or two before we are ready to ship products. We do not reconfirm orders before processing cards.
Orders can be canceled and deleted before container is received. If additional items were ordered along with main item on pre order, then we will ship additional items after we receive main item on pre order.
To check most recent updates on Pre Order please click here.
What is difference between SATURN and SATURN TRITON?
BoatsToGo, Inc operating BoatsToGo.com web site is a manufacturer and trademark owner of SATURN Boats, Rafts and Kayaks. We are manufacturer of all Saturn boats, rafts, kayaks and paddle boards.
Canyon Rafts, operating web sites SaturnBoats.com and SaturnRafts.com is one of our authorized dealers in Idaho, and listed at https://www.boatstogo.com/dealers.asp
Canyon Rafts orders from us one of exclusive SATURN variations they call SATURN TRITON. That particular SATURN TRITON variation has C7 brand valves and heat welded seams. That way Canyon Rafts can stand up from our offering, and utilize different price structure. Therefore BoatsToGo.com does NOT sell SATURN TRITON inflatables.
While some of SATURN boats sold by BoatsToGo.com now also come with heat welded seams, most of our boats does not use C7 brand valves, so that to allow Canyon Rafts to stand up from our offerings.
What is difference between C7 valves and Saturn valves? Valves used in inflatables that are sold by BoatsToGo.com have exactly same pushpin design as UK manufactured C7 valves. However difference is in a valve cap shape, and method of attachment hose to the valve. Both, SATURN boats sold by BoatsToGo.com and SATURN TRITON variation sold by SaturnRafts.com/SaturnBoats.com are made by same factories, using same materials.
Please send us your questions and we will add them to this FAQ list.