Premium Quality Inflatable Boats!
-
Inflatable Boats
-
- 8.6' Inflatable Dinghy Boats SD260
- 9.6' Inflatable Dinghy Boats SD290
- 11' Inflatable Dinghy Boats SD330
- 11' Inflatable Boats SD330W
- 12' Inflatable Boats SD365
- 13' Inflatable Boats SD385
- 13.8' Inflatable Boats SD415
- 14' Inflatable Boats SD430
- 15' Inflatable Boats SD470
- 16' Inflatable Boats SD488
- 18' Inflatable Boats SD518
-
- KaBoats
- Rafts
-
Kayaks
-
- 8.6' Travel Sit-On-Top Micro Kayak SOT260
- 13.5' Paddleboard / Kayak SUP414
- Paddleboard Catamaran Kit SUPCAT80
- Paddleboard Catamaran Kit SUPCAT
- 12' Fishing Micro Skiff Kayak MSUP365
- 13' Fishing Micro Skiff SUP Kayak FSUP380
- 13' Xtreme Fishing Micro Skiff XFSUP380
- 14' Fishing Micro Skiff FSUP430
- 13' Ocean/River Fishing Kayak OFK396
- 13' Fishing Inflatable Kayaks FK396
-
- Catamarans
-
SUPs
-
- 13.5' Paddleboard / Kayak SUP414
- Paddleboard Catamaran Kit SUPCAT80
- Paddleboard Catamaran Kit SUPCAT
- 12' Fishing Micro Skiff Kayak MSUP365
- 13' Fishing Micro Skiff SUP Kayak FSUP380
- 13' Xtreme Fishing Micro Skiff XFSUP380
- 14' Fishing Micro Skiff FSUP430
- 13' Inflatable Pedal Board PFSUP385
- Electric Fin Motor For Kayaks and SUPs V2
- K4C Remote Steering Electric Fin
-
-
Fishing
-
- 13' Fishing Micro Skiff SUP Kayak FSUP380
- 13' Xtreme Fishing Micro Skiff XFSUP380
- 14' Fishing Micro Skiff FSUP430
- 13' Ocean/River Fishing Kayak OFK396
- 13' Fishing Inflatable Kayaks FK396
- 12' Light Inflatable Rafts RD365
- 9.6' Fishing Inflatable Boats FCB290
- 12' Fishing Inflatable Boats FCB365
- 13' Fishing Inflatable Boats FCB385
- 13' Heavy-Duty KaBoat SK385XL
-
-
Accessories
-
- Rudder for Pedal Kayaks
- Central Console For Boat
- Seating Frame For Boats, KaBoats, Rafts and Kayaks.
- Seating / Standing Fishing Frame For Boats, KaBoats, Rafts and Kayaks
- Set of 2 Short Aluminum Benches
- Rowing Frame for 2 People
- Paddleboard Catamaran Kit SUPCAT80
- Paddleboard Catamaran Kit SUPCAT
- Aluminum Fishing Chair V4.0
- Extra High Back Kayak Seat
Please download the Aluminum Floor Assembly Manual for more details.
Hard Floor Assembly Instructions
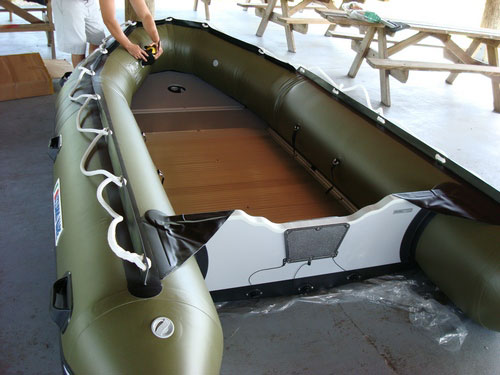
Installing the hard floor for the first time may seem difficult. This is normal. After assembling and disassembling the boat a few times, the process will become much easier and faster. For best results, have at least two people assist with assembly, especially during the first few installations.
Step 1 – Position the Keel
The inflatable keel is usually folded to one side during packing. Before installing the floor for the first time, partially inflate the keel and make sure it is centered inside the hull with the air valve facing upward. Once properly positioned, deflate the keel while keeping the valve on top. This will help align the keel valve with the opening in the front floorboard during assembly.
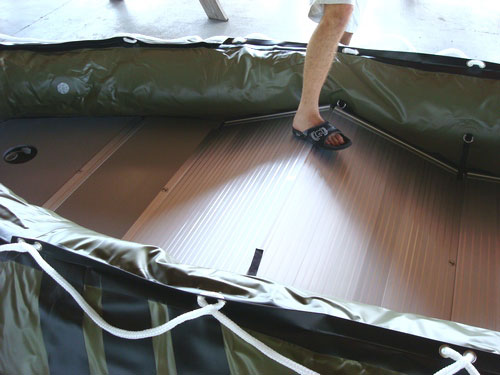
Step 2 – Prepare the Floorboards
Place all floorboards inside the boat hull. Make sure there is an equal gap between the edges of the floorboards and the boat tubes on both sides. These gaps are necessary for installing the aluminum side stringers later.
Important: Keep any sharp aluminum edges away from the inflatable tubes. To prevent accidental damage during assembly, you may cover exposed edges with duct tape or painter’s tape.
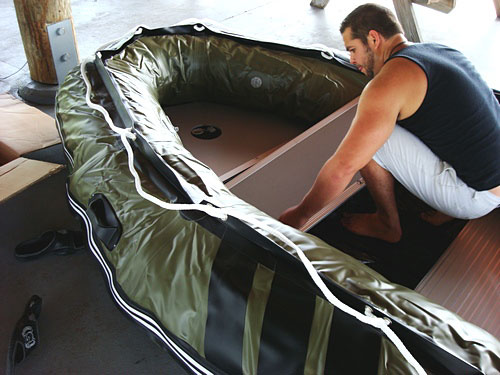
Step 3 – Install the Floorboards
Begin with the front floorboard (#1) and continue installing the remaining floorboards toward the center of the boat.
Next, install the rear floorboards and work toward the center until all floor sections are in place.
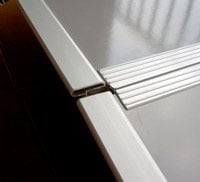
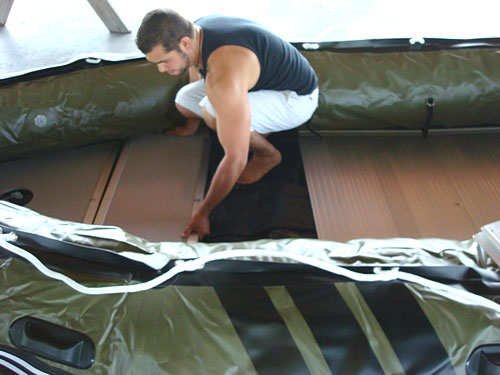
The two center floorboards will usually overlap slightly. Lift the overlapping edges upward to form a roof-like shape. Then carefully step on the raised section to flatten the floorboards into their final position. This locks the center floor sections together and creates a flat floor surface.
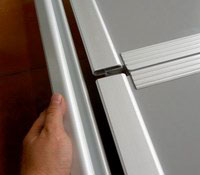
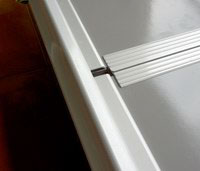
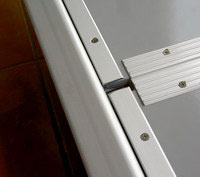
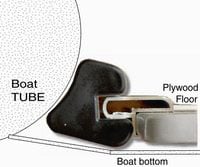
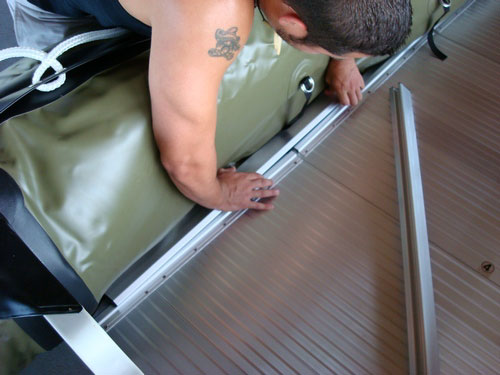
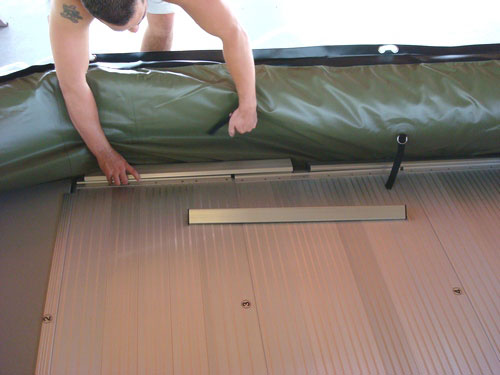
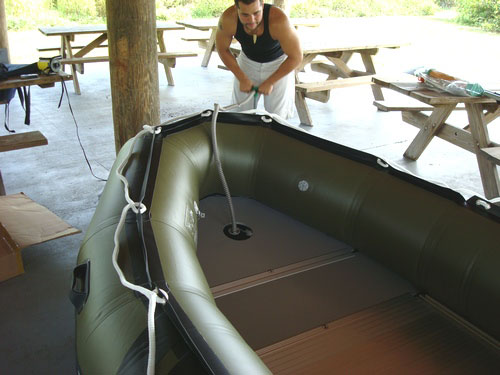
Step 4 – Install the Aluminum Side Stringers
The aluminum side stringers are designed to cover and reinforce the joints between the floorboards. They do not run the full length of the floor. Most boats include 4 (four) long side stringers.
Installing the stringers can be the most challenging part of the assembly process. A simple trick can make it much easier:
Place one assembled rowing oar along the bottom of the boat. Lift one side of the boat slightly and slide the oar partially underneath the hull. This will raise the edge of the floorboards, creating enough clearance to slide the aluminum stringers over the floorboard edges.
Install the stringers on one side first, then repeat the same process on the opposite side.
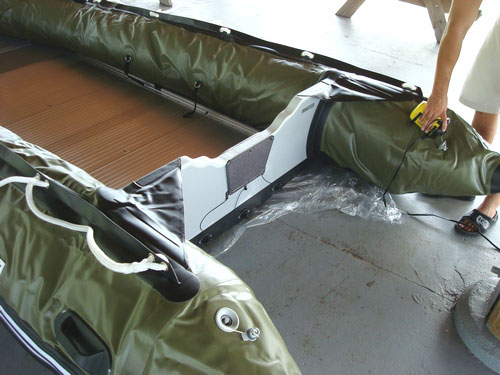
Step 5 – Fully Inflate the Boat
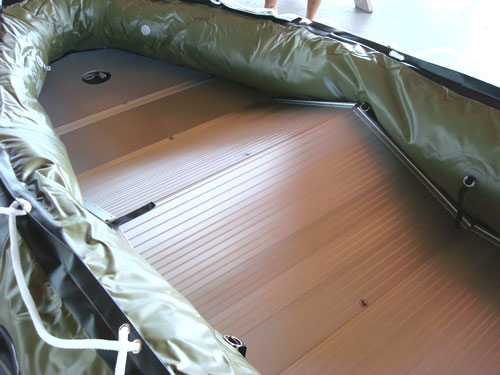
Once all floorboards and side stringers are installed, fully inflate the boat tubes to the recommended pressure.
As the tubes inflate, they will press the stringers firmly into the floor channels and lock the floor system securely in place.
When properly inflated:
- The tubes should feel firm to the touch.
- There should be little or no visible wrinkles in the tubes.
- The floor and stringers should fit tightly and securely inside the hull.
Your hard floor is now fully assembled and ready for use.
|
Hard floor assembly details |
||

|
|
|
| Insert stringers into side edges of floorboards. Side edges of floorboard should easily fit into C-channel of stringer. | ||
|
|
|
| Top View | Bottom View | Correct stringer position |
|
Step-by-step instruction on assembly of plywood or aluminum floors. |
|
| Inflate boat about 20% and insert front bow section of the floor. |
|
| Insert second and last sections of the floor. |
|
| Two middle sections will create roof-like structure. |
|
| Step on raised part of two connected floor sections. |

|
| Make sure that floor will flatten by spreading inside the boat. |
|
| Insert aluminum stringers between boat tubes and floor sections. It would be easier to do if oar or paddle will be placed between ground and boat bottom, such way that to lift edge of board off the ground. |
|
| Aluminum stringers should connect at least two or more floor sections. Ensure that all floorboard joints are covered by stringers. Do not push the stringers all the way toward the transom. It is acceptable to have spaces between adjacent stringers. |
|
| Inflate left and right tube of the boat. Use hand pump to finish. |
|
| Inflate bow section of the boat. Use hand pump to finish. |
|
|
|
Last step is to inflate keel of the boat with a hand or electric pump. |
Customer Service
Company info
© 2002-2026 BoatsToGo, Inc | [email protected]